Do you like being in lock down?
Locked down but not locked out. An experience of lifetime.
Despite of challenges posed by lock down, we can all agree that one thing that was in abundance is time. There wasn’t much toilet rolls. But, there was plenty of time.
I took up a personal project inspired by one of the solutions that my team and I brainstormed and implemented on the fly before. A few years back, I was leading a hybrid cloud migrations project. My team had a strict deadline to meet a milestone.
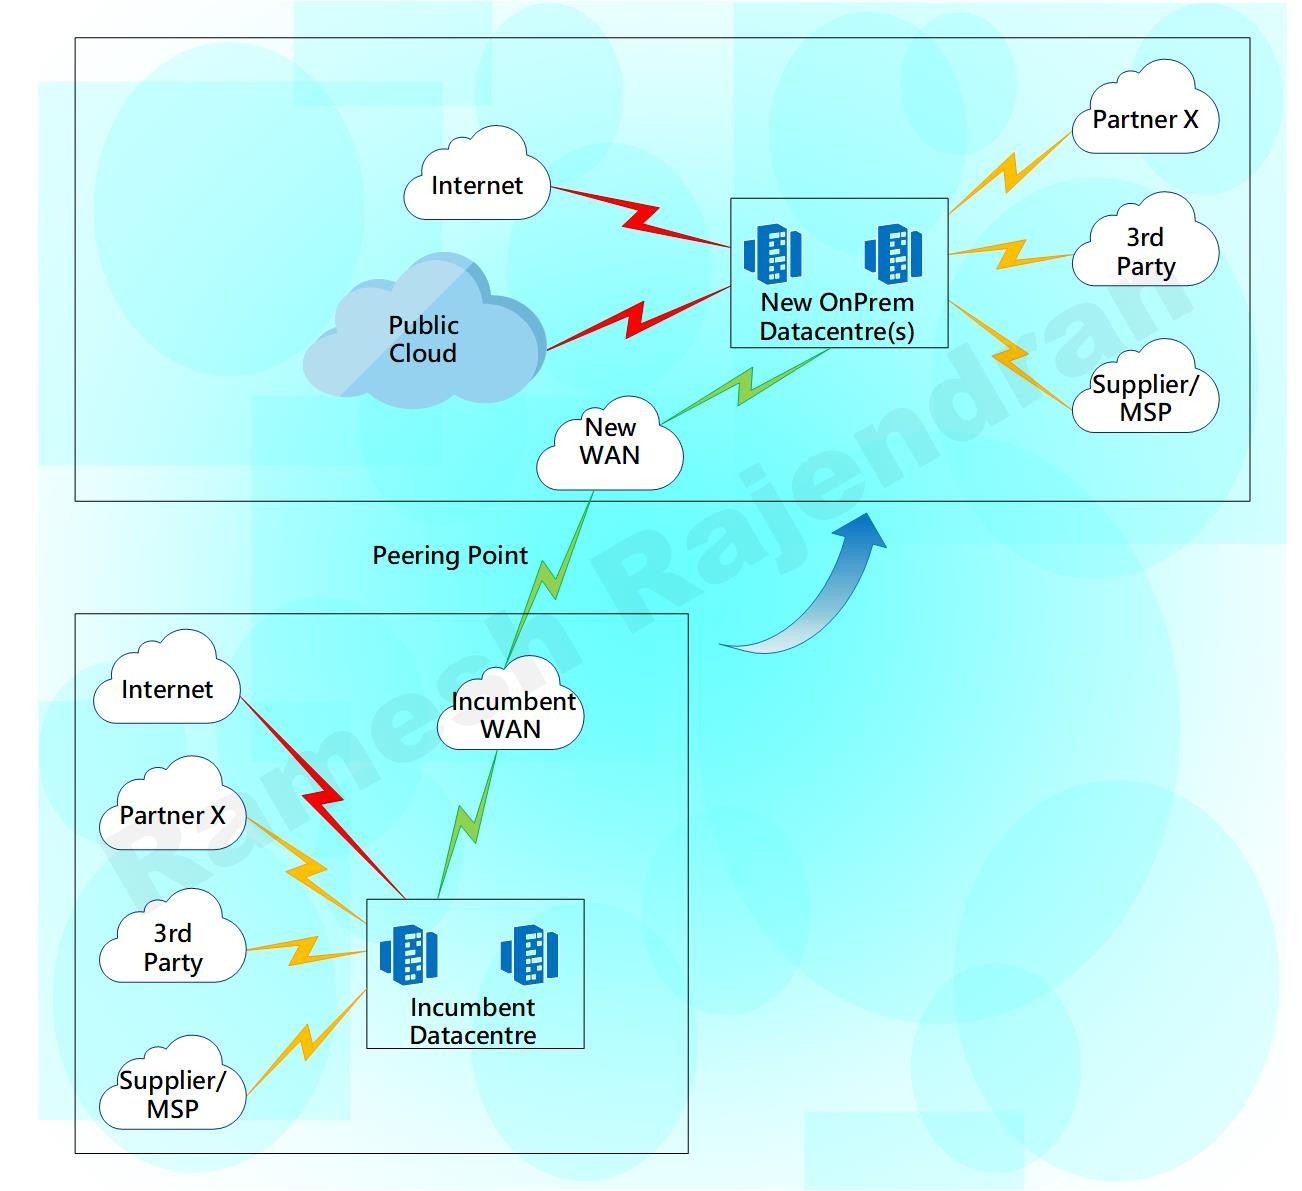
This particular client had 100+ applications, multiple circuits with various 3rd parties, partners and suppliers. Our migration strategy had been moving all applications and infrastructure as they were without much changes. My team built the infrastructure to move the applications. One of the 3rd party circuit provider didn’t play ball, just weeks before migrations, the 3rd party said “they are slightly grey on the circuit delivery date, it will probably be delivered after the planned migration date”. Do we need to move the migrations date or move as we planned? We went ahead with the plan.
How did we resolve the issue?

We deployed a new layer 2 connection between the legacy data-centre and the new hybrid data-centre. Layer 2 overlay helped us to retain the design. We were able to follow the design as we planned, without much changes.
I worked on Application layer gateways, tunnelling protocols IPSec and GRE when I started my career as an engineer trainee. One of the interesting projects I worked on was that VLANs over GRE with IPSec protection on. We managed to extend the VLANs over Internet. This was back in 2004–2005. Overlay has evolved over period of time.
There are some disadvantages with overlay. Tunnelling is subject to routing/switching loops, and it is difficult to get deterministic performance in an overlay with the traffic overhead and bandwidth hungry traffic such as broadcast and multicast. Routing loops can be fixed by isolating the overlay routing from the underlay routing. Switching loops can be fixed with a simple spanning-tree solution. In overlay, your throughput and performance are highly dependent on the type of traffic that you send. However, these issues can be fixed by changing underlying infrastructure configurations. Though, you cannot avoid overhead, but you can reduce impact of overhead and fragmentation by increasing MTU and reducing latency in the links. Similarly, broadcasts and multicasts can be contained at source to avoid the impact of it.
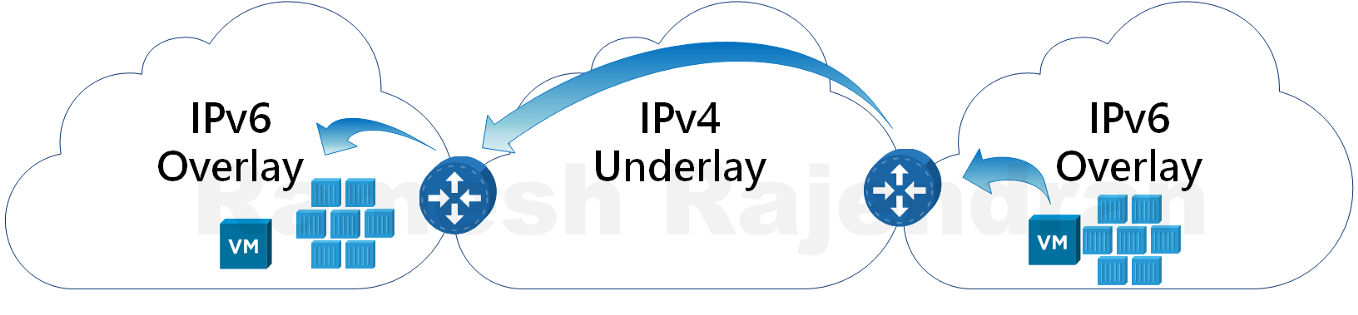
Overlay is really helpful during migrations when you don’t want much changes in underlay infrastructure. For eg, If you want to host nested infrastructure such as hypervisor over hypervisor or If you want to run containers overlay or IPv6 overlay in IPv4. I have seen one of my customers using overlay to segregate traffic between different departments over shared infrastructure to meet security requirements.
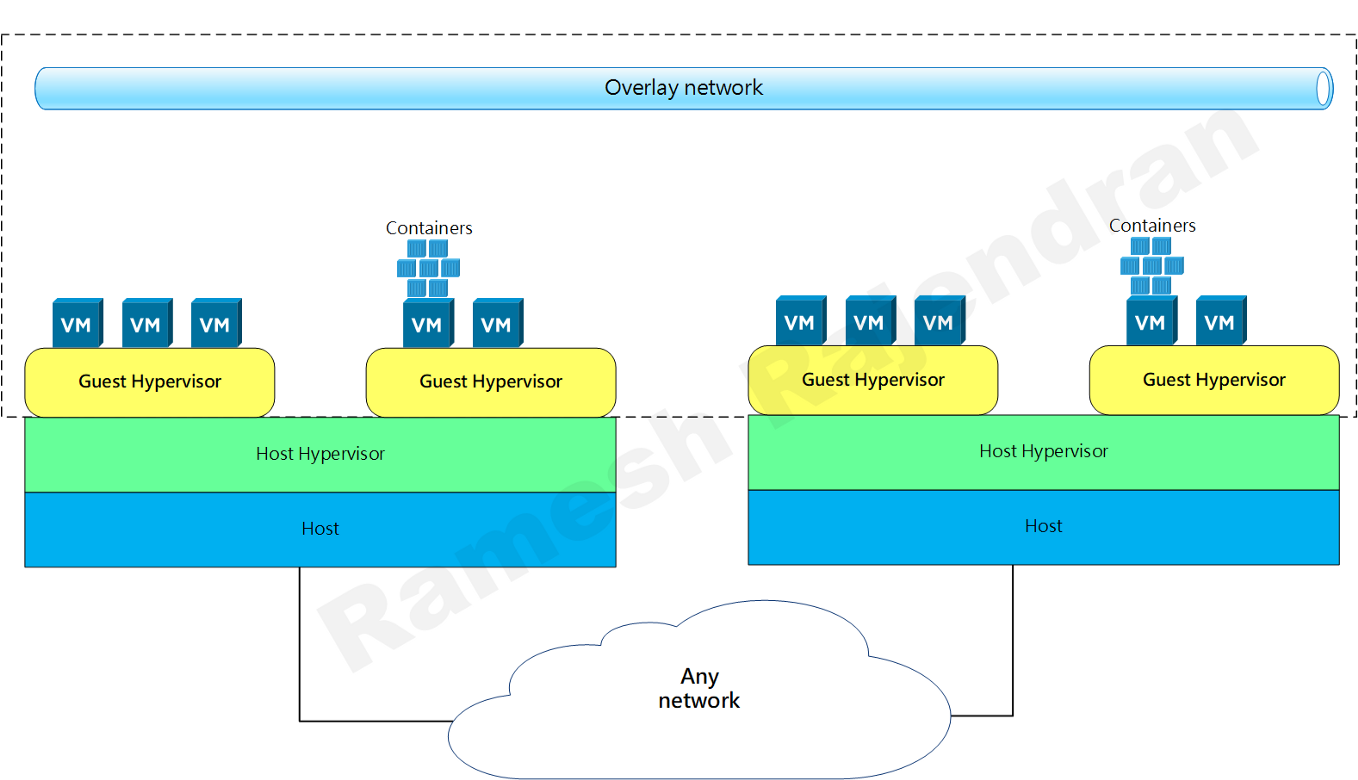
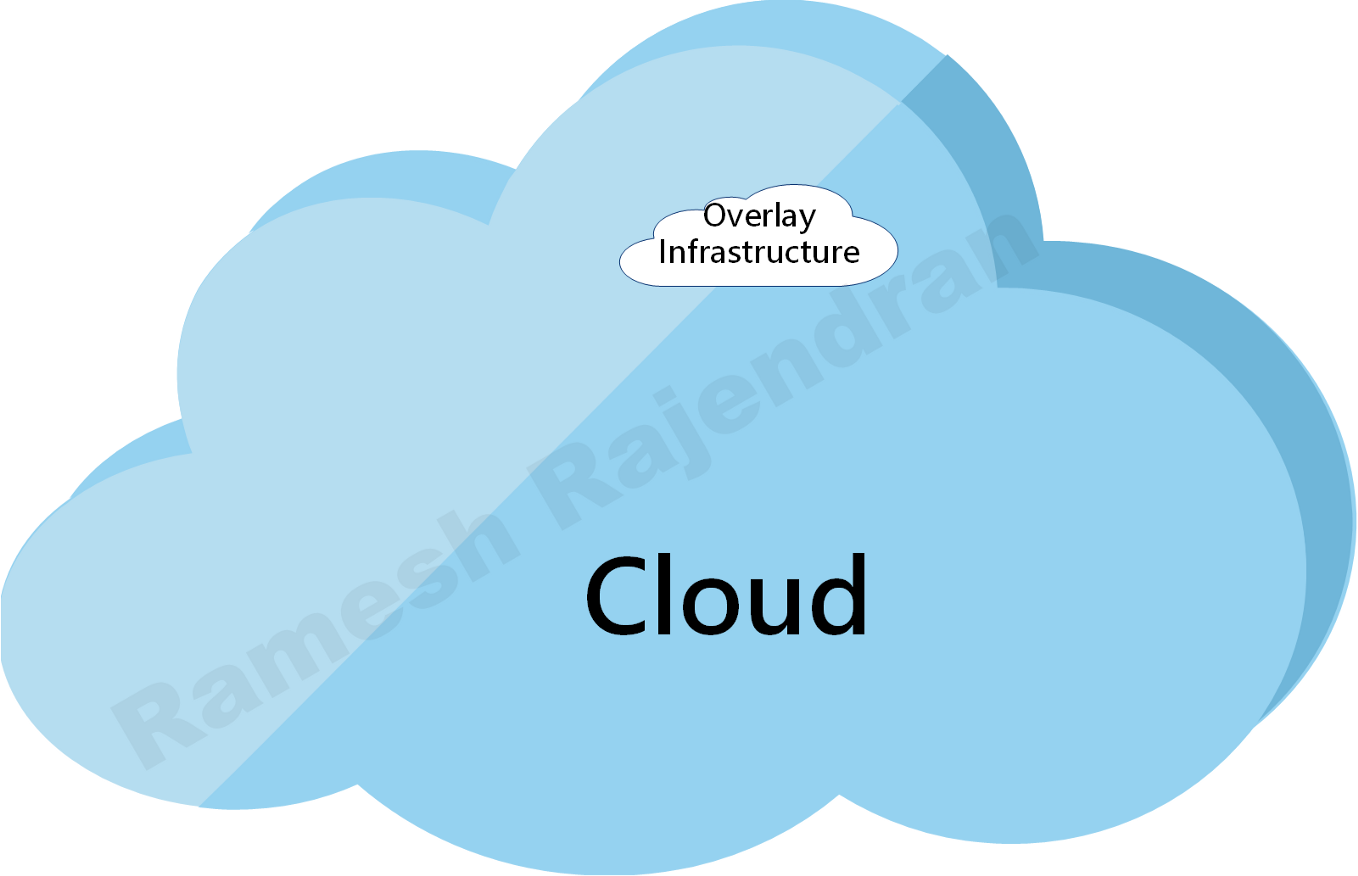

In the above diagram, orange network and blue network don’t mix with each other even though they sit in same hypervisor.
Overlay Use case
Some applications are quick wins in the cloud migration strategy, exchange can be quickly transformed to a SaaS application office365. But, custom made legacy applications cannot be easily transformed to cloud native applications. Major cloud service providers recommend to move application without changes as part of the cloud migration strategy in enterprise architecture. Overlay are really helpful when you want to extend your infrastructure over multiple cloud without affecting the underlying infrastructure.
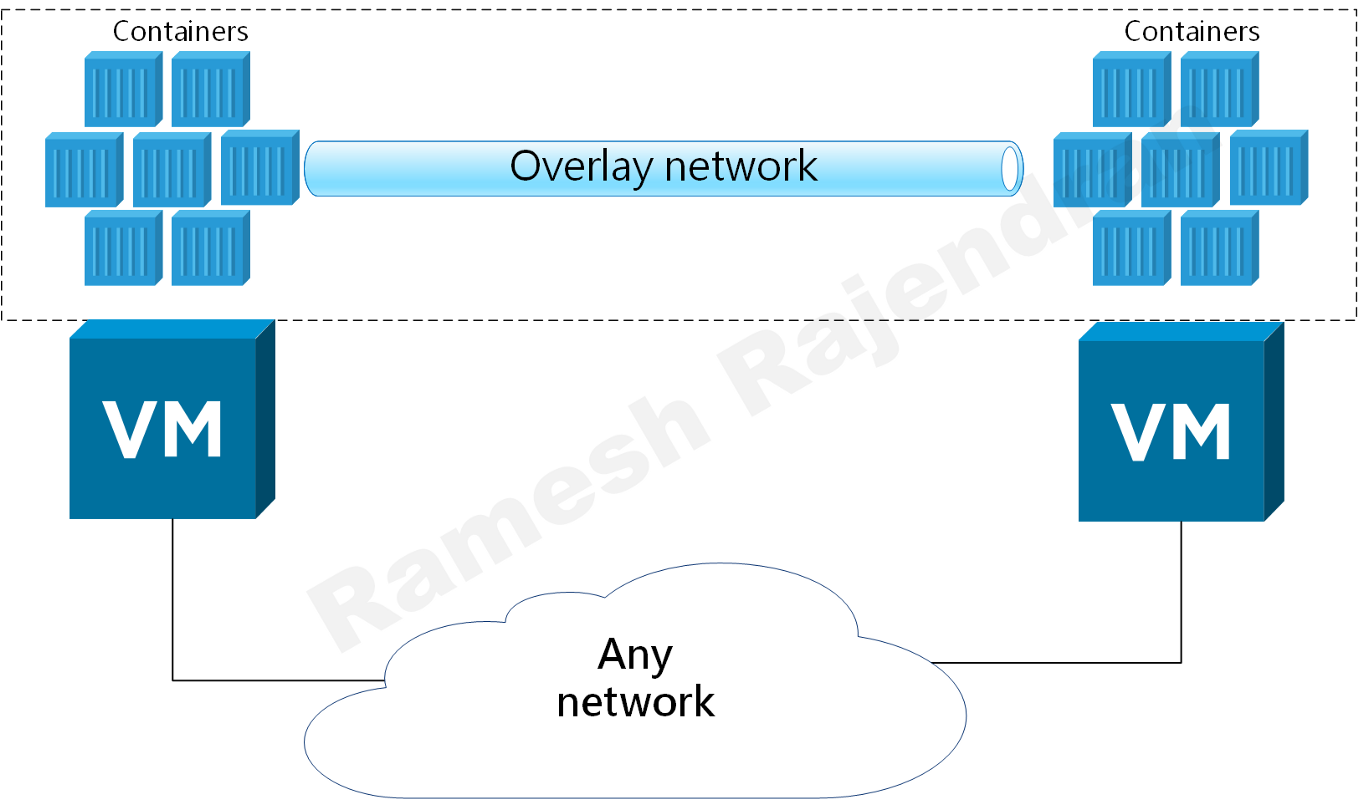
To demonstrate a use case of overlay, I developed an overlay solution over hybrid and multi-cloud environment.
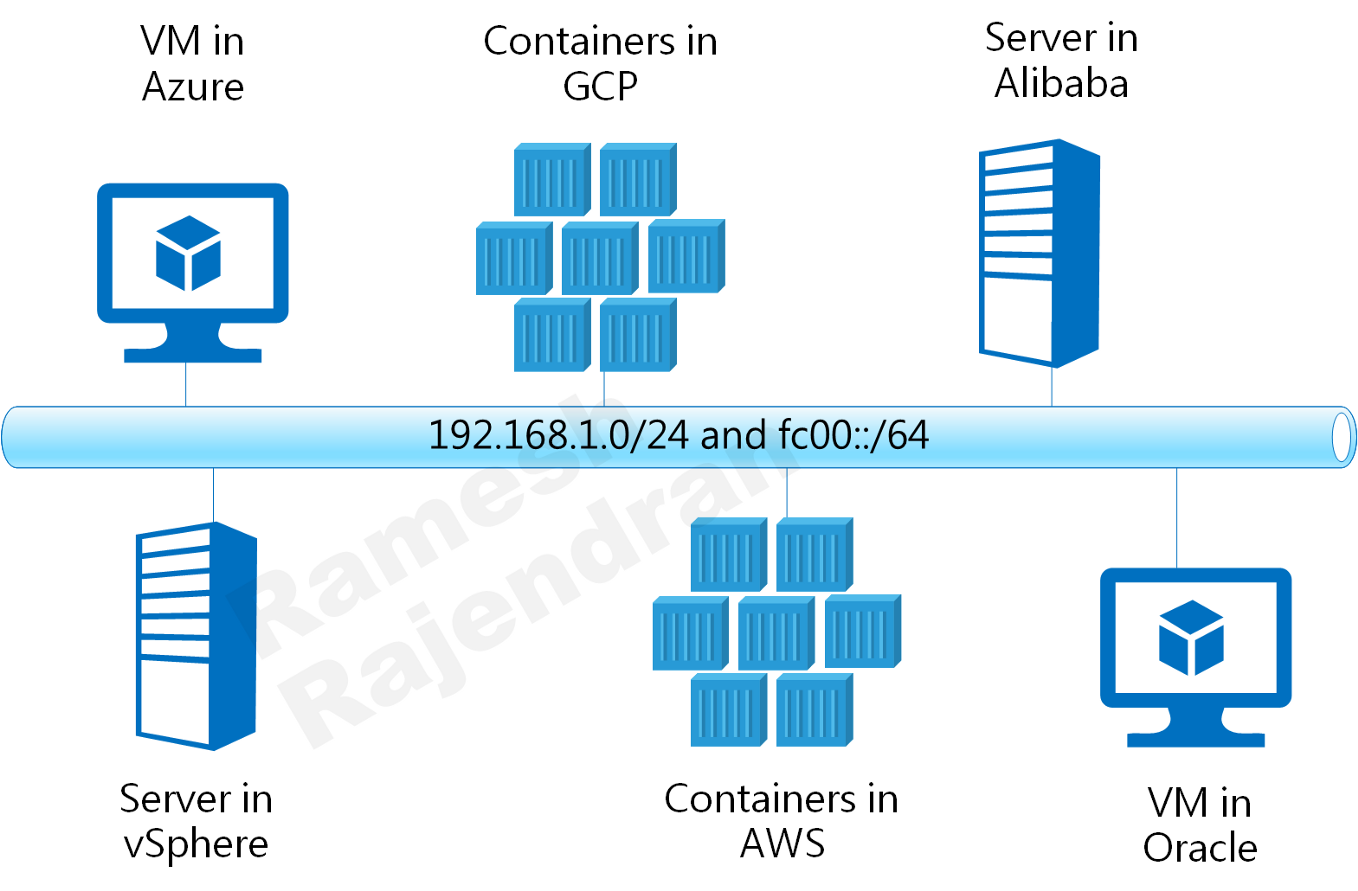
Think of it as VMs and containers connected to same LAN. Overlay protocols IPv6 and IPv4 are independent of underlying infrastructure. I used DevOps tools to deploy, test and destroy the entire solution dynamically.
Cloud environments that I picked up for this solution are
1. Public clouds AWS, AZURE, GCP, Oracle and Alibaba Cloud
2. Private datacentre based on vSphere
Even if you don’t want to deploy overlay or multi-cloud, you should be able to use just subset of the scripts to create Jenkins multi parallel pipelines, configure security policies, build virtual machines and attach multi NIC cards in the major cloud environments.
Initially, I started with point to point overlay just over two cloud.
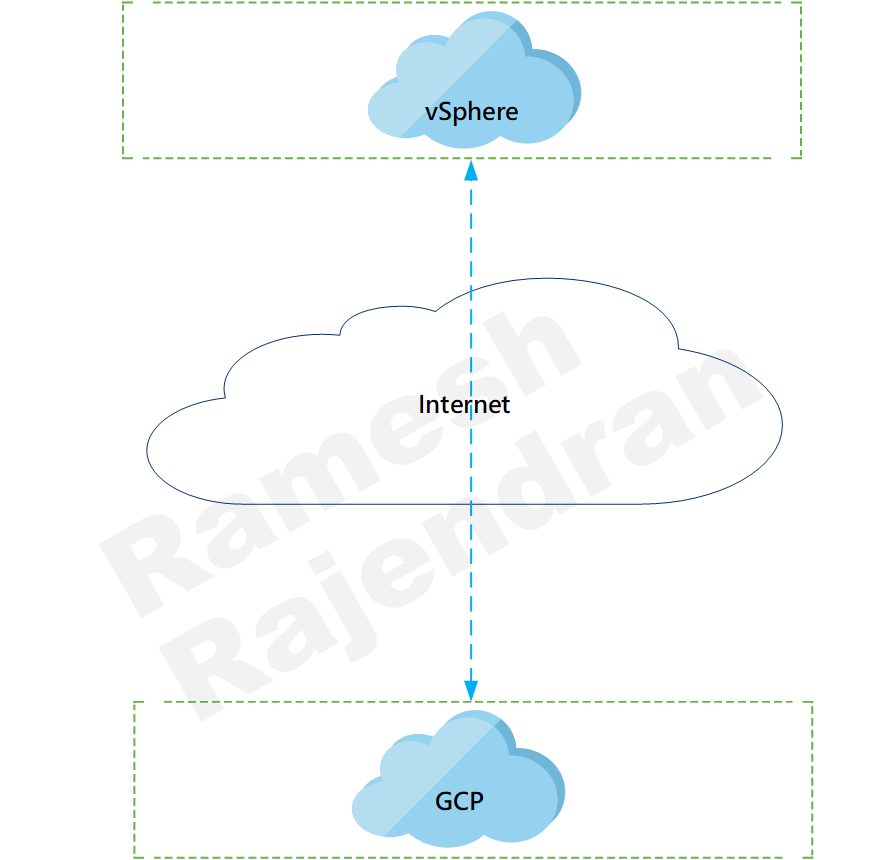
What is the fun in playing overlay over two cloud? I want to put all well-known cloud providers in the mix. I picked up hub and spoke scenario.
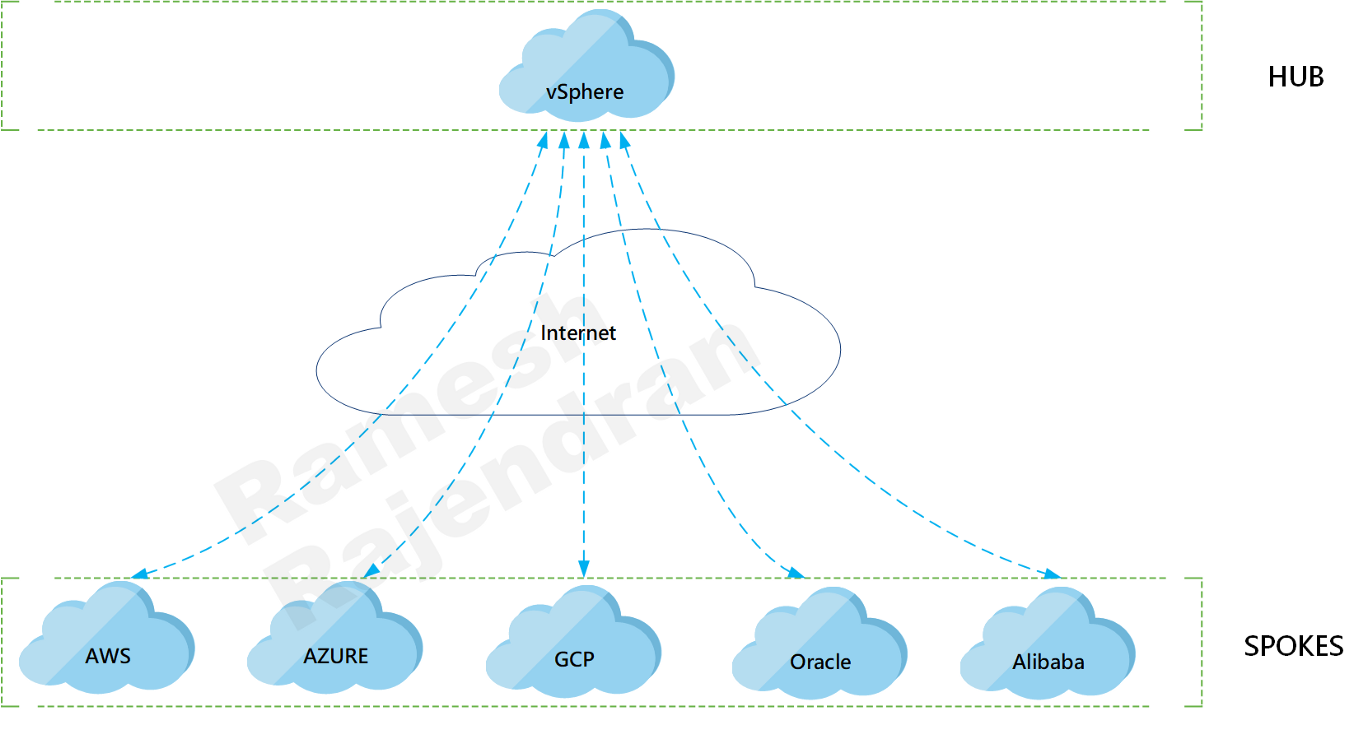
Design Rationale is that I need a topology to incorporate most of the public clouds to demonstrate overlay, and hub & spoke can accommodate multiple clouds. Moreover, if I use DevOps scripts, I should be able to swap hub and spoke dynamically.

Overlay protocol can be switched between VXLAN and GENEVE. This solution can be implemented in other topologies such as multi hub and cloud within cloud. In hub and spoke scenario, all traffic between spokes will be transferred via Hub. All VMs and containers sit in the same IPv4 and IPv6 subnets, and they were able to communicate over both IPv6 and IPv4 with no dependency on underlying infrastructure.
Lets look at the components in this hub and spoke topology.
I am calling the virtual machine that establishes tunnel with other public clouds as a router and the virtual machine that establishes tunnel with router as a Client. Traffic between two spoke sites always send via Router in Hub site. Router VM hosts atleast three Docker containers in each environment. All VMs and containers have dual stack configurations. VMs are built using Ubuntu. All router virtual machines have two interfaces. Client virtual machine in public cloud has only one interface.


One difference is that client virtual machine in VMware has two interfaces because I preferred to have dedicated management interface in private cloud. All public cloud virtual machines are managed over internet and private cloud virtual machines are managed within the environment over dedicated management interface.
Tools, DevOps and Scripting
I preferred to bring up the environment dynamically and tear down the environment when they are not required. To do this dynamically, I picked up
- OVS an open source implementations of virtual switch
- CI/CD tool Jenkins
- shell scripts
- ansible
- terraform
- packer
- Groovy that comes with Jenkins
- Docker
- Ubuntu Virtual machines
Scripts brought up Ubuntu virtual machines from ISO, Docker containers dynamically and configured overlay across all clouds.
I picked up multiple parallel pipelines within Jenkins that helped me to build the infrastructure faster in parallel within multiple clouds. Building virtual machine from ISO takes most of the time as I didn’t use pre-built virtual machine template. vSphere takes less than 5 minutes with pre built virtual machine template. In public cloud, script takes about 5 minutes to build the infrastructure.
I have uploaded the scripts under the below repository.
https://github.com/MrRameshRajendran/Hybrid_MultiCloud_Overlay
I have a bunch of environment variables in the script which really defines the backbone variables required in each cloud environment. I added comments throughout the scripts where I can and you can also find information in Jenkinsfile and README file.
With the environment variables, you can choose overlay protocol such as geneve or vxlan, you can prefer to destroy the resources once you tested them, you can choose subnets, and you can define cloud API key files that required to connect the cloud.
Jenkins — Environment variables — Important ones
- CLOUD_LIST — “aws_azure_gcp_ali_oracle_vsphere”
- TUNNEL_TYPE — GENEVE or VXLAN
- REMOVE_CONFIG
- TF_VAR_L2_OVERLAY_NETWORK
- TF_VAR_L2_OVERLAY_v6NETWORK
- AWS_SECRETS_FILE
- AZURE_SECRETS_FILE
- TF_VAR_GCP_KEY_FILE
- OCI_SECRETS_FILE
- ALI_SECRETS_FILE
- VSPHERE_SECRETS_FILE
You can either define them in the main Jenkins script or you can have it in the Jenkins GUI. You can find more environment variables in the code repository.
When comes to keys, I recommend you to use vault or any form of encryption to store the API keys. In this project, I am using environment variables to store the keys as I didn’t share the script with others during development phase. Keys won’t be visible in the logs. If you switch on the debug, keys will be visible in the logs. Give more attention when you are publishing scripts in github and when you are sharing the log files.
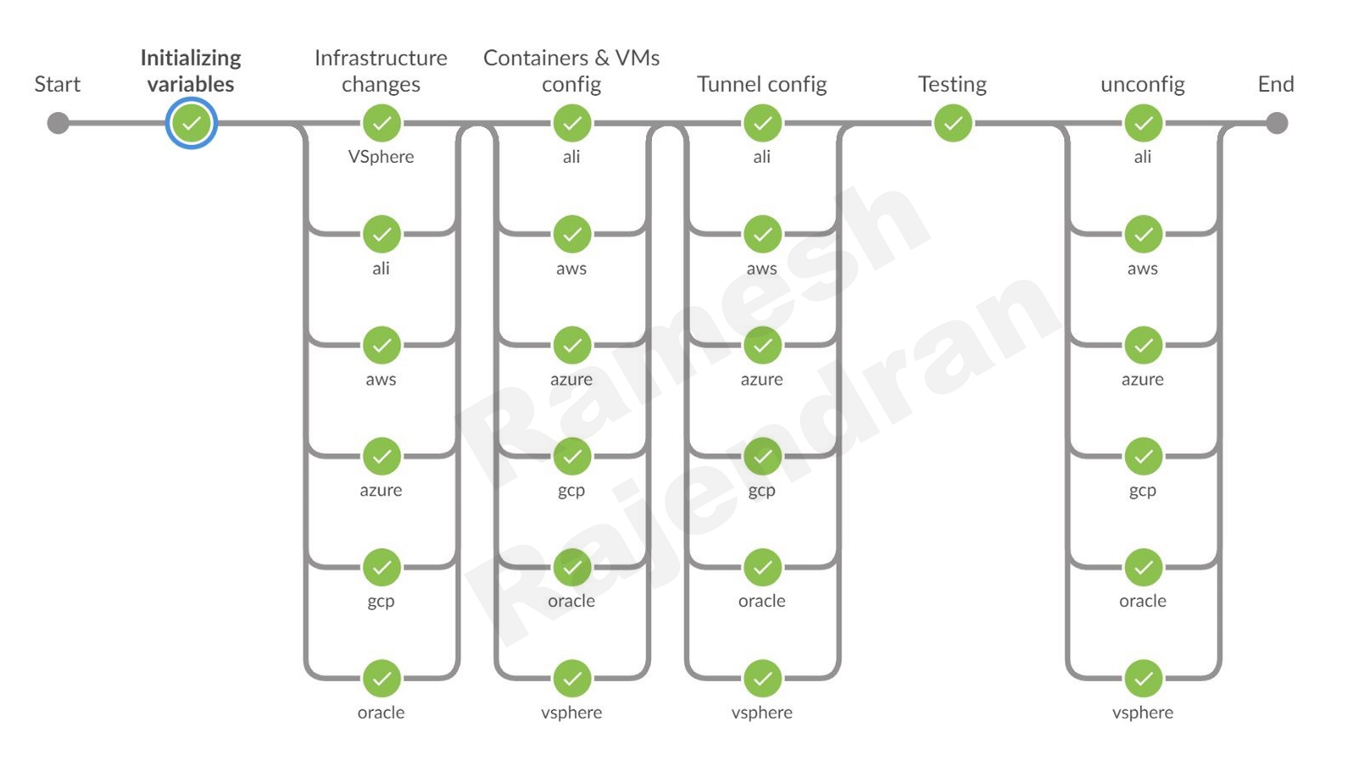
In this pipeline, you can see six stages.
Lets look at the stages one by one,
- In the first stage “Initializing variables”, as name states, I am assigning values for the variables. If you want to assign values dynamically prior to creating resources, you can do in this stage.
- In the 2nd stage, “Infrastructure changes”, terraform script is bringing up virtual machines in all environment. This stage also provisions the virtual machines with necessary packages.
- In the 3rd stage, “Containers & VMs config”, ansible scripts are bringing up containers in all router virtual machines. We are also gathering IP addresses to terminate tunnels in this stage.
- In the fourth stage, “tunnel config”, this is where all magic happens, connectivity is established based on the information prepared in the previous step. Ansible scripts are bringing up tunnels between hub and spoke sites over router virtual machines. Initially, I thought of writing the tunnel configurations in Python. However, I managed to accommodate within Groovy.
- In the final stage, “testing”, connectivity is tested from the client virtual machine located in hub site to the all containers and client virtual machines located in all spoke sites.
Once the testing is completed, scripted stage “unconfig” will be called from the main script to destroy all resources created in previous stages.
In some occasions, parallel pipeline try to access variables at the same time. To avoid over writing, I defined lock blocks within parallel pipeline. It is similar to semaphore, lock restricts you from accessing same variable multiple times at the same time.
Sample code —Jenkins pipeline — Multiple Stages — lock():
If a stage fails, you don’t want to stop the whole build process. You can dynamically mark a stage as failure using “unstable” function.

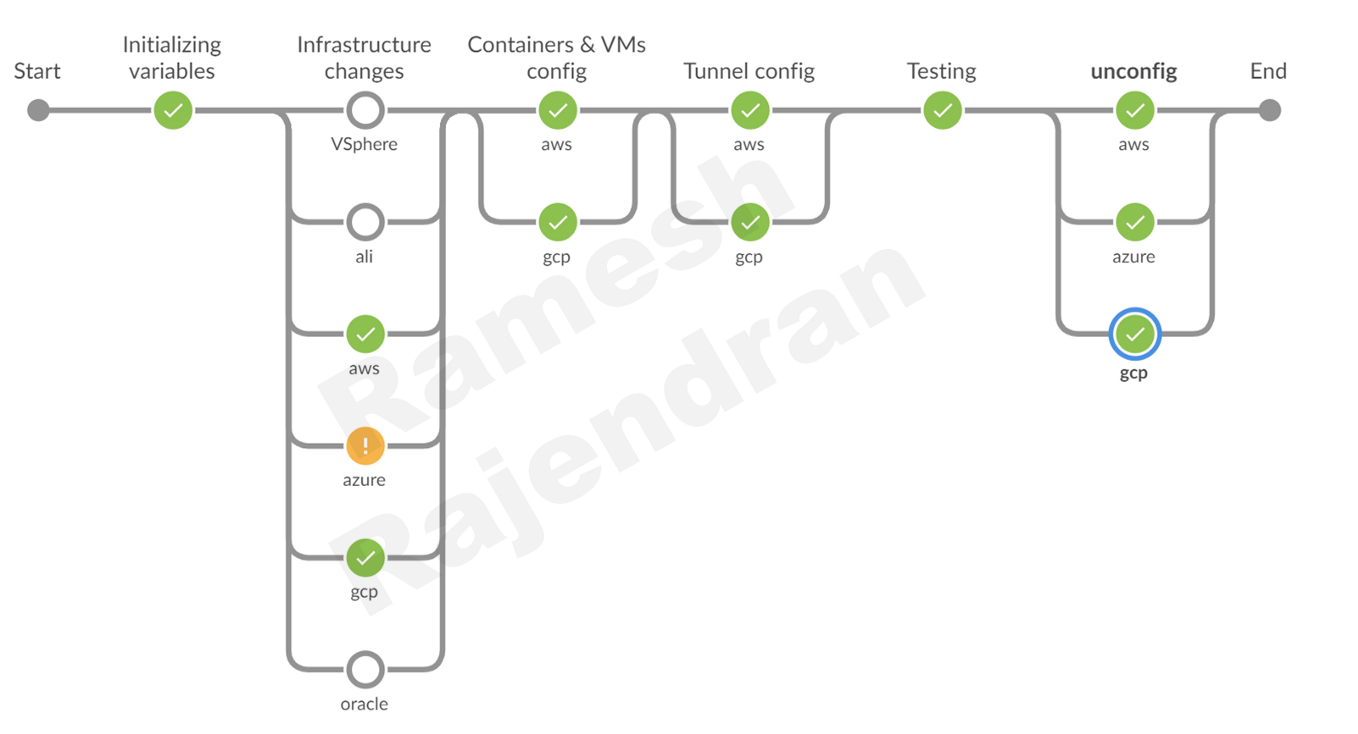
You can dynamically add or remove stages.


As you see in this screenshot, I used only three clouds in this deployment. I greyed out unused clouds during build and removed all other clouds in the remaining stages.
Sample code — Declarative pipeline — Parallel build:
Sample code — Parallel build — Dynamic stages:
Challenges — Terraform, Ansible, Packer and vSphere
I came across an old school looping issue while testing the tunnel. I tackled looping issue by implementing spanning-tree.
I came across some challenges while writing this script. Especially, when I try to bring up two interfaces in router virtual machines. I will cover the challenges I had with each environment in the next video.
Lets look at the vSphere on premise environment.
VM templates require vCenter license. So that, you can clone the virtual machines. My setup didn’t have any vCenter.
How did I bring up VMs? I used packer to build the VM directly from ISO image.
Virtual machines dynamically pickup ip-addresses. There was no way for me to fetch the ip-addresses of virtual machines while building them. Especially, I need to know router public IP address to establish the tunnel.
How did I fixed the ip-addresses issue?
Well, I exercised an old school trick. Using Packer, I hard coded a predefined mac address in the router virtual machine. My DHCP server got the private IP reservation for this particular mac address. My ISP router has static NAT configurations for this particular private ip address. Router virtual machine will use the same ip address to talk to the internet.
To connect back the virtual machines, I need to know the management ip address of them. It is not easy to find the ip of the client machine while provisioning. But, you can fix this by using “file download” in packer. Just grep the ip address from the interface, stored it in a file and download the file. You can get the management ip from the file.
In Public cloud, only my router virtual machines needed two network interfaces. If you take a typical VMware environment, you probably have a dedicated VM management interface in addition to the payload interfaces. So, I deployed two network interfaces for each virtual machine. It is easy to assign multiple Ethernet interfaces to virtual machines using packer. What is not easy is that order of interfaces.
Where I used Terraform and ansible?
Packer is for building a golden image. Packer usually shuts down and deletes virtual machines once build is completed. Since I am not using any vcenter, it is better for me to retain the image rather than rebuilding the virtual machine again.
I used terraform “null resource” to bring up the virtual machines when packer shuts down the virtual machines.
In the last stage, How I deleted the virtual machines after testing? Tf state file doesn’t have virtual machines and Packer is not an appropriate tool to destroy the resources. Well, I used ansible to shut down and delete the virtual machines.
In vSphere firewalls, you need to allow SSH and VNC to build and provision virtual machines. vSphere firewall rules are not retained between reboots. You need to follow knowledge base mentioned here to make the rules as persistent.
https://kb.vmware.com/s/article/2011818
vSphere usually comes with the self-signed certificate for the management. Please make sure that certificate has vSphere hostname or ip address. Automation server should trust the certificate that you configured in the vSphere. I had some issue with untrusted certificates.
Challenges — AWS, Azure, GCP, OCI and Alicloud
AWS
Lets look at AWS public cloud environment.
I used terraform to bring up entire environment all public clouds. Provisioned the virtual machines with shell scripts.
In AWS, you can directly specify multiple network interfaces within virtual machine resources.
AWS also allow GRE and all IP based protocols. But, most of the public clouds are limited to TCP, UDP and ICMP traffic.
But, I had an issue with the routing. Router virtual machine had two interfaces. Both interfaces received default route. If the router picks up wrong interface, I will lose the management connectivity. I exercised a simple trick here. I wrote a small script to set the lower metric for the backend interface in the router. Since it got the lower metric, routing table will list the backend interface routes as the least preferred route when two routes are listed for the same destinations.
All other setups and configurations in AWS are a piece of cake. Easy to manage.
Azure
It was not hard to automate Azure. I wish Azure could make the API key generation quite straight forward like other clouds, API key generation is quite tricky. Originally, I started with GRE tunnelling and then I stumbled upon a document saying that IP based ACLs, GRE and IP tunnelling are blocked within Azure. After which, I shifted to GENEVE and VXLAN overlay protocols. I didn’t have any issue with configuring multiple interfaces. But, I noticed a few warning messages from terraform. Some of the resources syntax have been changed. Resource ”azurerm_virtual_machine“ has been superseded by “azurerm_linux_virtual_machine” and “azurerm_windows_virtual_machine“. I couldn’t specify the provisioners directly within the resources block. Once virtual machines are created, I used null resource to connect back the virtual machines and then provisioned the virtual machines. Dual interfaces in Azure is automatically handled. We don’t need explicitly employ any fix to handle the asymmetric routing. Your first interface in the network interfaces list always used as the primary interface.
GCP
In GCP, I didn’t have any issue with configuring multiple interfaces. I could specify the provisioners’ directly within the resources block. Routing with Dual interfaces in GCP is automatically handled. No asymmetric routing issue. Your first interface in the network interfaces list always used as the primary interface.
OCI
In OCI, virtual machine deployment and public IPs deployment sometimes 1–2 minutes faster than other clouds. Just like Azure, OCI API key generation is quite tricky. All other configurations are straight forward In OCI, Multiple interfaces creation involves two step process. I can directly create the primary interface within “oci_core_instance”. Any additional interfaces should be created outside resources block and should be attached to virtual machine. Interface tends to be down in virtual machine because you are attaching the interface after virtual machine build activity. However, you can fix this by using null resource, where you can log into virtual machine and bring up the interface. It should fix the issue. There is no limitation with asymmetric routing.
Alicloud
In ALI cloud, I had an asymmetric routing issue with router virtual machines. Once virtual machines are provisioned, I created an interface and attached the interface with the router virtual machine. Just like AWS, the new backend interface was down. With the use of “null resource provisioning”, I could bring up the new interface with less optimal dhclient metric. This fixed the asymmetric routing issue.
Video blogs related to this article are mentioned below


