Better Static Website Hosting on S3: AWS Solutions Architect’s Guide
How to set up AWS S3 static website hosting with CloudFront and Route53. Handle SEO, HTTPS, logging, and more.
This guide is all about setting up and using an S3 bucket for static website hosting on AWS. I want this guide to be a complete source of knowledge on the topic (aside from the Amazon docs, I suppose). Please let me know in the comments if there's anything I have missed, anything I got wrong, or anything you would like added.
I like simple. When deploying a new website or application, I want to know that it's always up and available to users while also requiring no attention or maintenance from me. If you want your website to work this way too, use static website hosting. Skip all the hassle of dealing with VPSs, OS updates, patches, certificate expiration, etc. If you are running a small business website or a blog, this should be a no-brainer. AWS S3 provides a super-easy way to deploy a static site that will virtually always be available, never crash, and requires no maintenance.
Here's what we are going to cover in this article:
- Who can use S3 static website hosting to deploy a website?
- Recommended static website architecture
- Should I use a CDN (CloudFront)?
- Should I use HTTPS?
- How to configure static website hosting on the S3 bucket
- How to configure your CloudFront CDN (Optional)
- How to configure DNS via Route 53
At the end, your site will be live on the internet. It will load fast from any location and will require very little attention from you to keep it running. Now you can spend more time creating content or running your business.
If you already know the details for configuring S3, CloudFront, and Route53 for static website hosting, skip down to the bonus topics section for more advanced techniques and configurations. Here's a list of the topics covered there:
Bonus Topics:
- SEO Setup: www and non-www URLs
- Logging - Set up web server access logs
- Restrict access to the S3 bucket
WWhat Sites Can Use Static Website Hosting?
The first thing we need to do is make sure your site is compatible with static web hosting. The only requirement is that the site serves static files (i.e., files that are the same for everyone that loads them). That usually means HTML, JavaScript, CSS, images, fonts, etc.) Files are not static when they are uniquely generated for each user as they are requested from the server. For example, sites built using PHP are rendered on the server. WordPress will not work!
This does not mean your site cannot have personalized or dynamic content.
It just means that the files loaded from your S3 bucket must be the same for every user that loads the site. There are ways to make the site dynamic even while using static web hosting. Two ways to do this are:
- Static JavaScript files can change the page dynamically in the browser.
- AJAX requests sent to a separate service/API can load personalized content after the initial page load.
These cases are covered in more detail in the bonus topics toward the end of this article. The bottom line is that static website hosting is best suited for sites that
- Do not have lots of rapidly changing data, and
- Use a tech stack that produces pure HTML, JavaScript, CSS, etc.
So what tech stacks are best?
There are many options. Any JavaScript based framework/library will work. Next.js and Gatsby (both React based) offer some excellent static site generation (SSG) capabilities. You can also use "plain" React, Angular, Vue, or Svelte. Or just develop HTML, JavaScript, CSS from scratch. Another option is to use AWS Amplify to host a single-page app (SPA), but I'm not going to cover that in
If you don't have a site ready, you can just use a simple HTML file to complete the article's exercises. Note that you will also need a domain name to be able to do the DNS setup.
index.html:
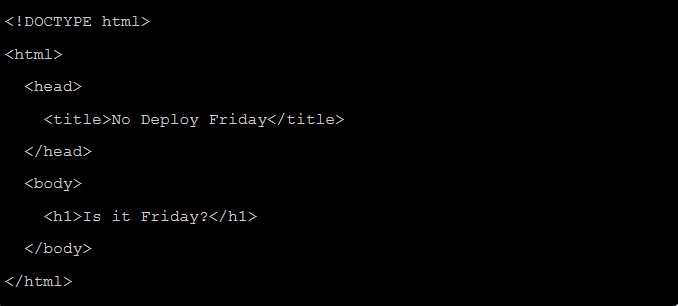
Now that you have your static content ready let's get it on the internet!
Recommended Architecture
Once you have the files you want to host, the first thing we need to do is get those into the bucket. There are a few other things to consider, though. If you were to only use static web hosting in S3, that would work, but the URL will look like this:

If you want to use your own domain name, we will need to configure DNS. The AWS DNS service is Route 53, which we will set up later on in this article. This simple setup would look like this:

Another consideration is that S3 static website hosting does NOT support SSL/TLS (https://) when accessed directly. Notice that the bucket URL displayed above has 'http,' not 'https.' It is highly recommended that you serve all web pages with HTTPS, even for entirely public content. Users will trust the site more when they see the green padlock (or other indication) on their browser. Using HTTPS indicates to the user that your site is legitimate and secure.
To use HTTPS with our S3 hosted site, we will add a content delivery network (CDN) to handle the SSL/TLS part. The AWS service for this is CloudFront, which we will also configure later on. Using a CDN also has the additional benefit of caching your content at several servers (edge locations) worldwide to speed up load time for users everywhere. When we add CloudFront, our architecture looks like this:
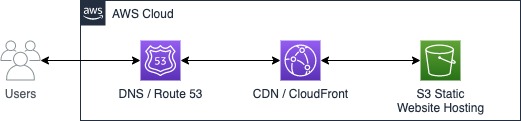
This is the architecture I recommend.
Using CloudFront is not the only solution to this. You could run a proxy server (like Nginx), but that requires additional configuration and ongoing monitoring. The simplest way around this is to use CloudFront.
Note that there are some issues using a CDN if your site has very low traffic volume or very high traffic volume. On the low end, the CDN servers may purge their cache if your site is not requested very frequently. This could actually result in slightly longer load times for some users. On the high side, CDN costs can get expensive when serving millions of page views, so be sure to check the CloudFront pricing sheet and see that the cost is acceptable given your estimated traffic. For some perspective, I estimate that your CDN cost would be about $3.55 if your site got about 100K page views per month.
(NOTE: I assumed a page load = 300KB and 10 HTTP requests. Your site may be drastically different)
I like to build this from the inside out. That means first hosting the content, then distributing it via CDN, then connecting the domain name. Other tutorials will go the other direction, but this makes more sense to me since it's easier to see success along the way.
How to Configure the S3 Bucket
Here's the hands-on part. To do this in AWS, you will need:
- An AWS Account. If you need to create one, go here: Create AWS Account.
- A domain name. You can purchase a domain name from Amazon or any other registrar.
In this section, we will create a bucket, enable static web hosting, and configure permissions.
- Open the AWS S3 Console
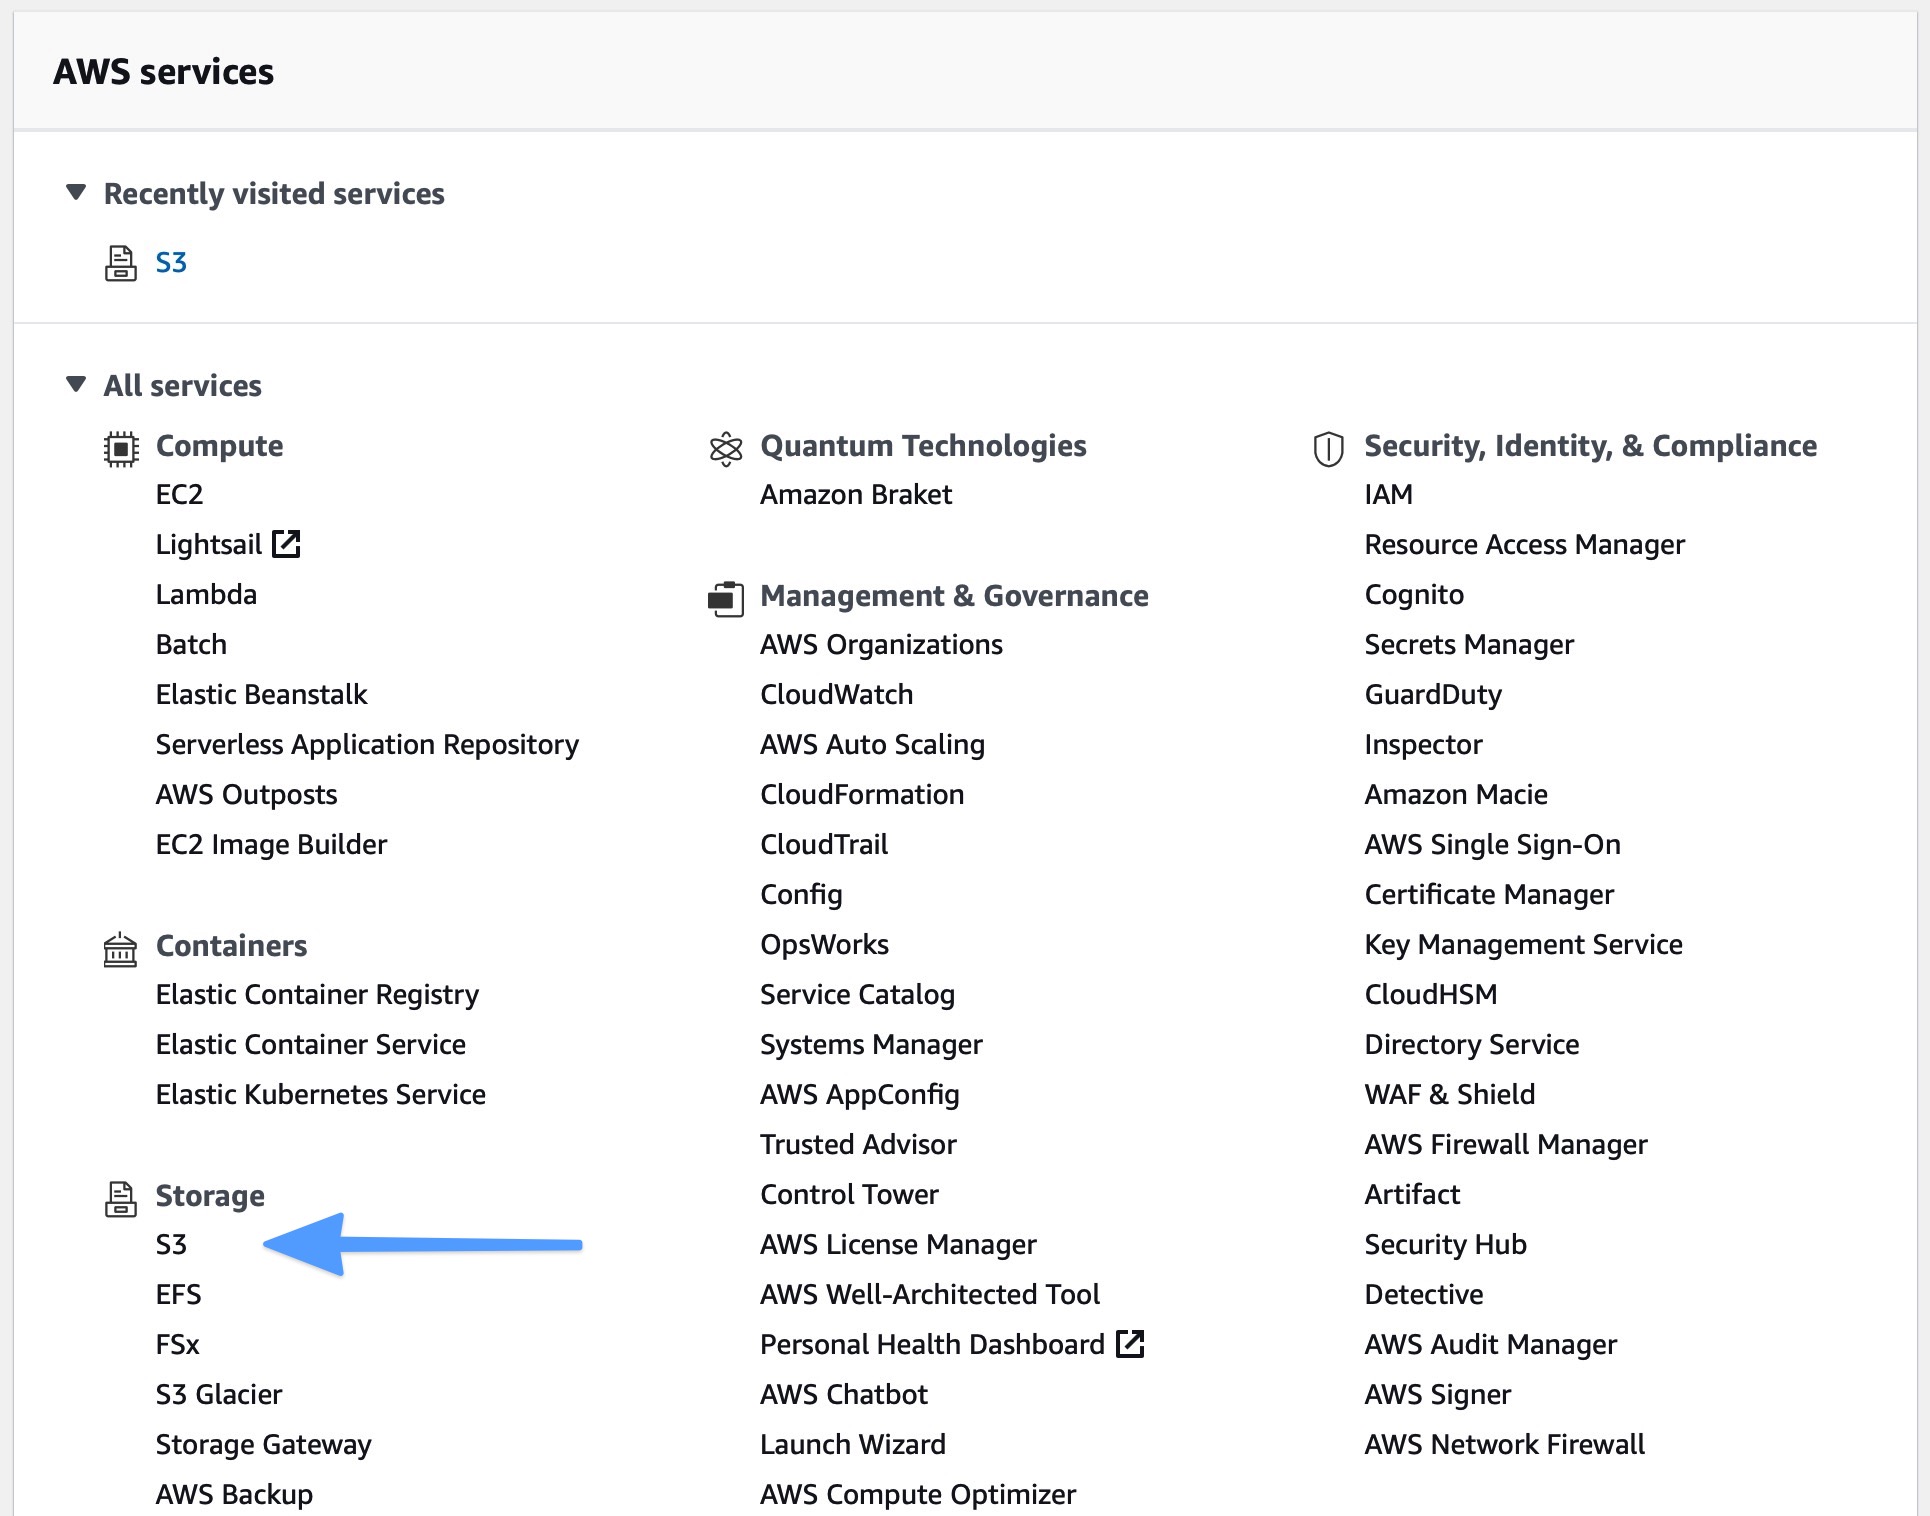
- Click Create Bucket

Bucket Naming
Bucket naming is important. S3 buckets are hosted in a specific AWS region but exist in a global namespace. This means that (like domain names) every bucket name can only be used once and is globally unique.
If you are not using CloudFront, your bucket name must match your domain name.
This is due to how AWS handles routing and DNS for the S3 servers. If you are going to use CloudFront, then you can name your bucket however you want. For this exercise, we will name the buckets to match the domain name.
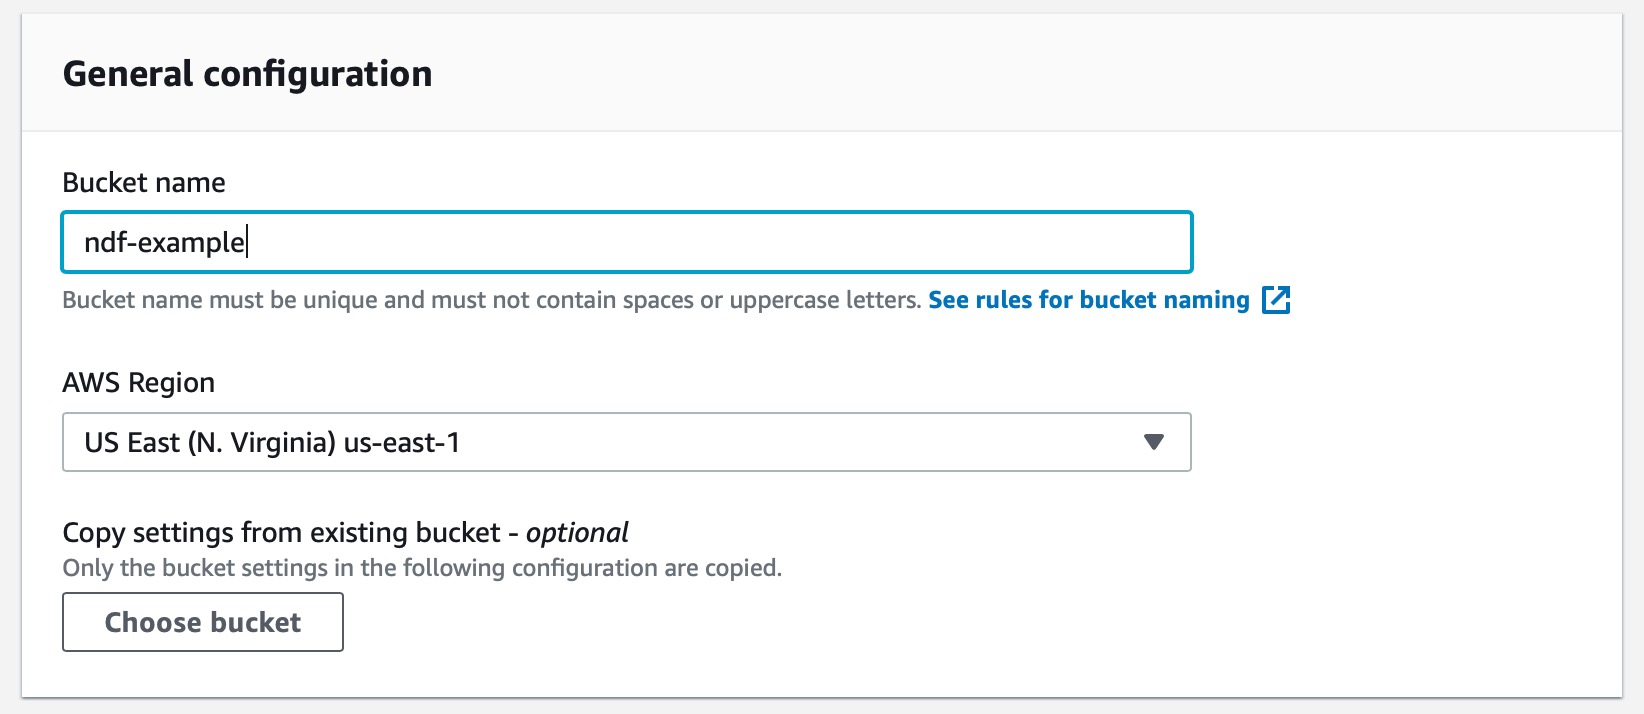
- Enter the bucket name and select an AWS region. The region does not matter that much, so choose any name you want.
- Open public access to the bucket. This does not reveal everything to the internet just yet. S3 has several layers of security so that people do not accidentally expose sensitive data. Uncheck 'Block all public access' and all its subsections. Acknowledge the warning at the bottom.
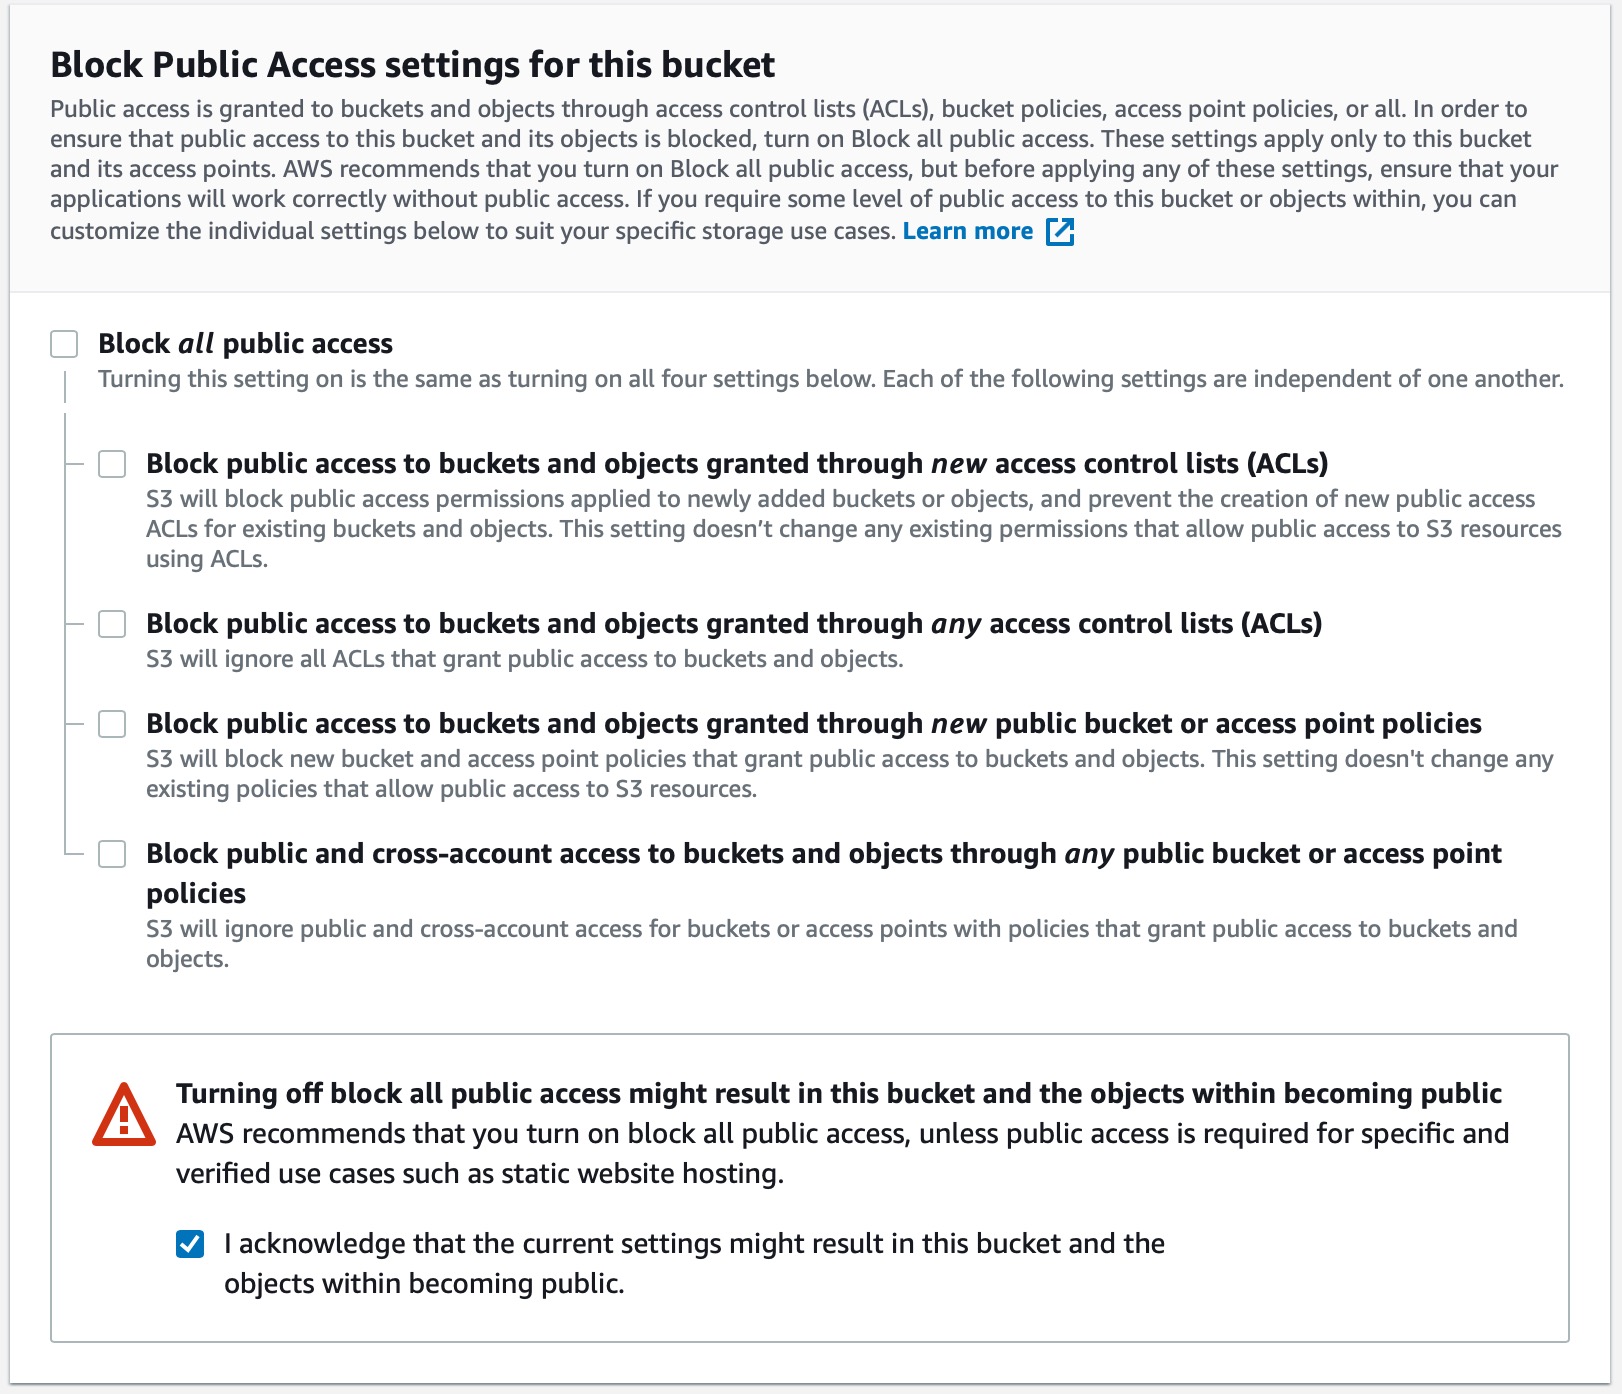
Leave all the other settings to their defaults and click Create bucket. After this, you will return to the list of S3 buckets, and you should see the bucket we just created. Notice that it says the bucket and objects can be public.

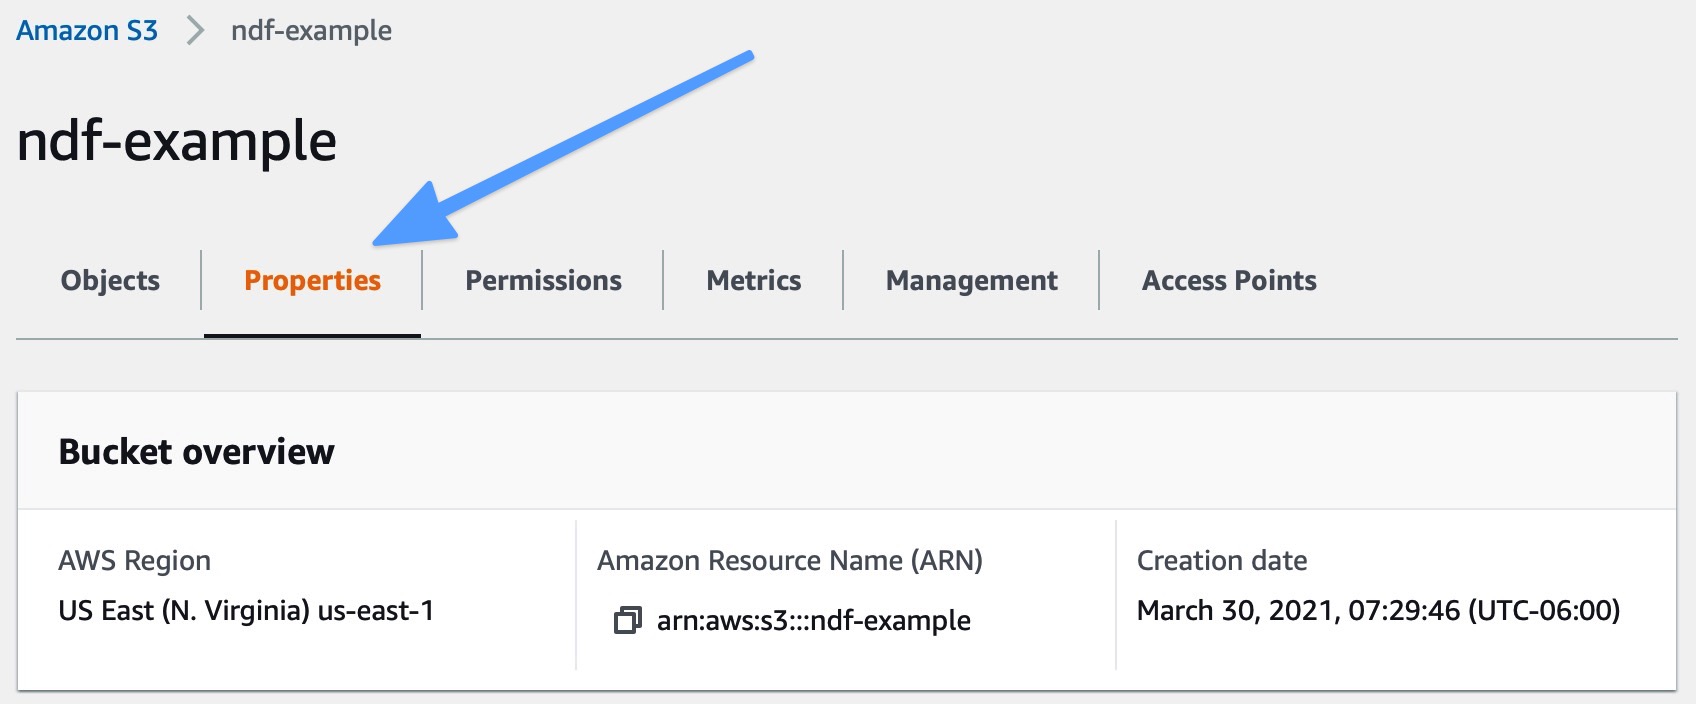
Click on the bucket name - ndf-example in this case - to open the bucket. You should see that there are no objects in the bucket.
- Enable static website hosting on the bucket. To do this, click the Properties tab right below the bucket name. Scroll all the way to the bottom and click 'Edit' in the Static website hosting section.

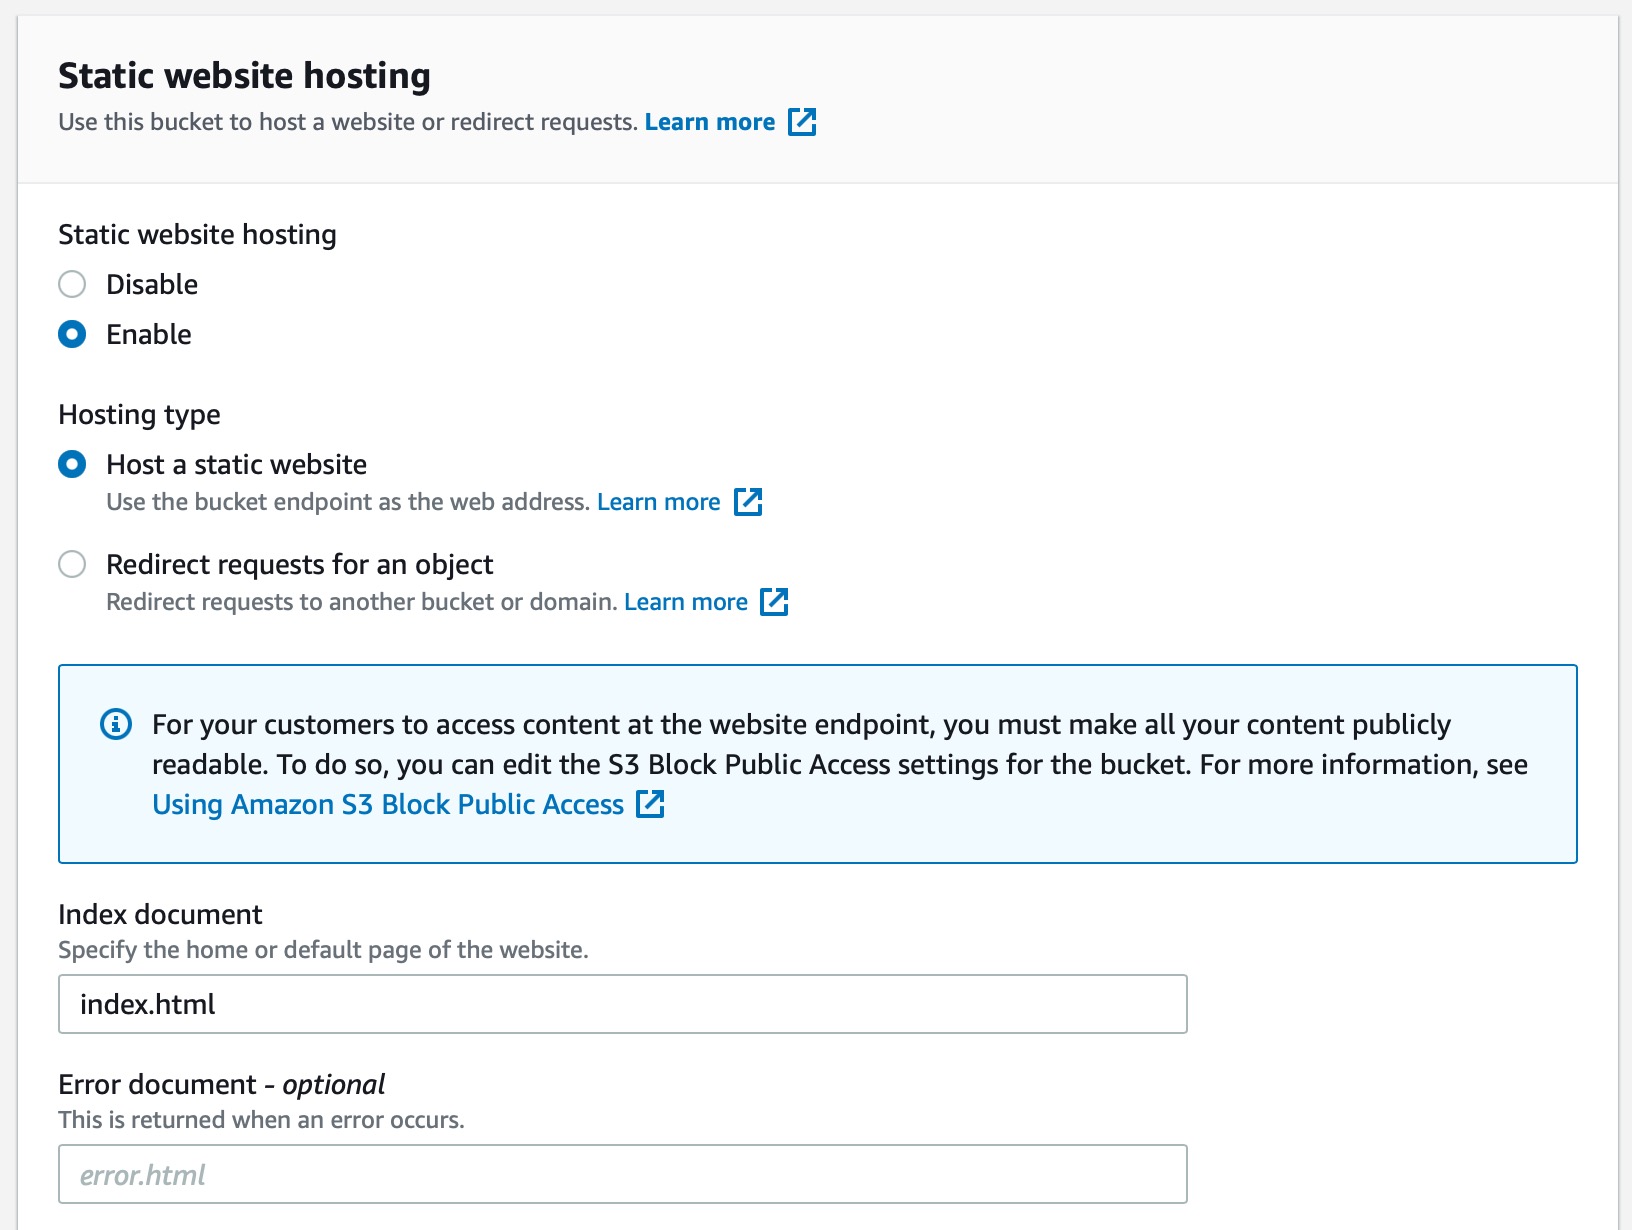
- Complete the static website hosting form as follows. Select enable and enter 'index.html' for the index document. You can leave other settings (including the error document field) as the defaults for now. Click Save changes when you are done.
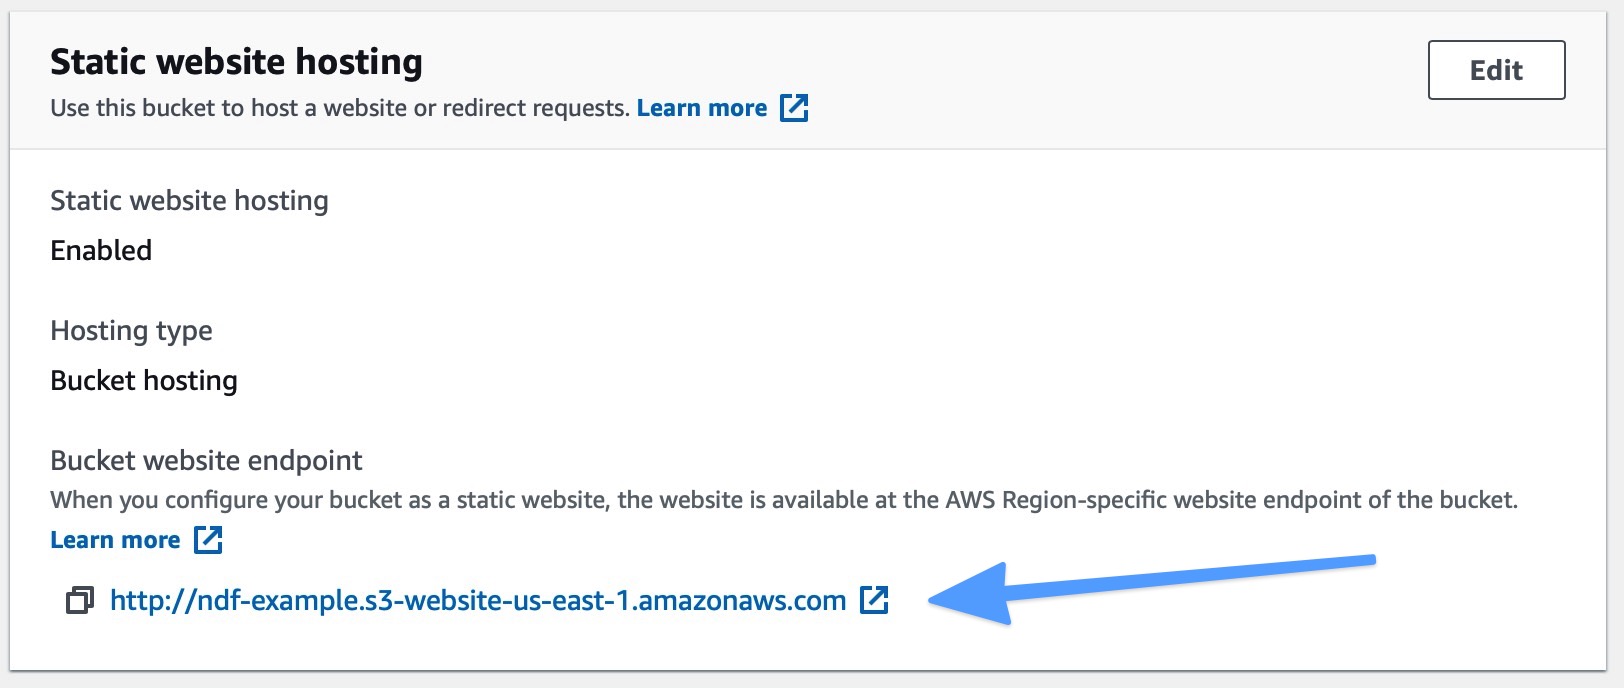
Still on the properties tab, you should see that static website hosting is enabled and that S3 has given you a website endpoint. Take note of this URL as we will use that to test that our site is working. If you try it now, you will see a 403 Forbidden error.
To fix the 403 Forbidden error, we need to upload our content and create a bucket policy.
Uploading Website Content
This can be the simple index.html file from above or many HTML, js, CSS, image files, etc. Just make sure that there is a file that matches whatever you entered in the 'index document' field when creating the bucket. For us, this is index.html.
- Click the Objects tab under the bucket name at the top of the page and click the Upload button.
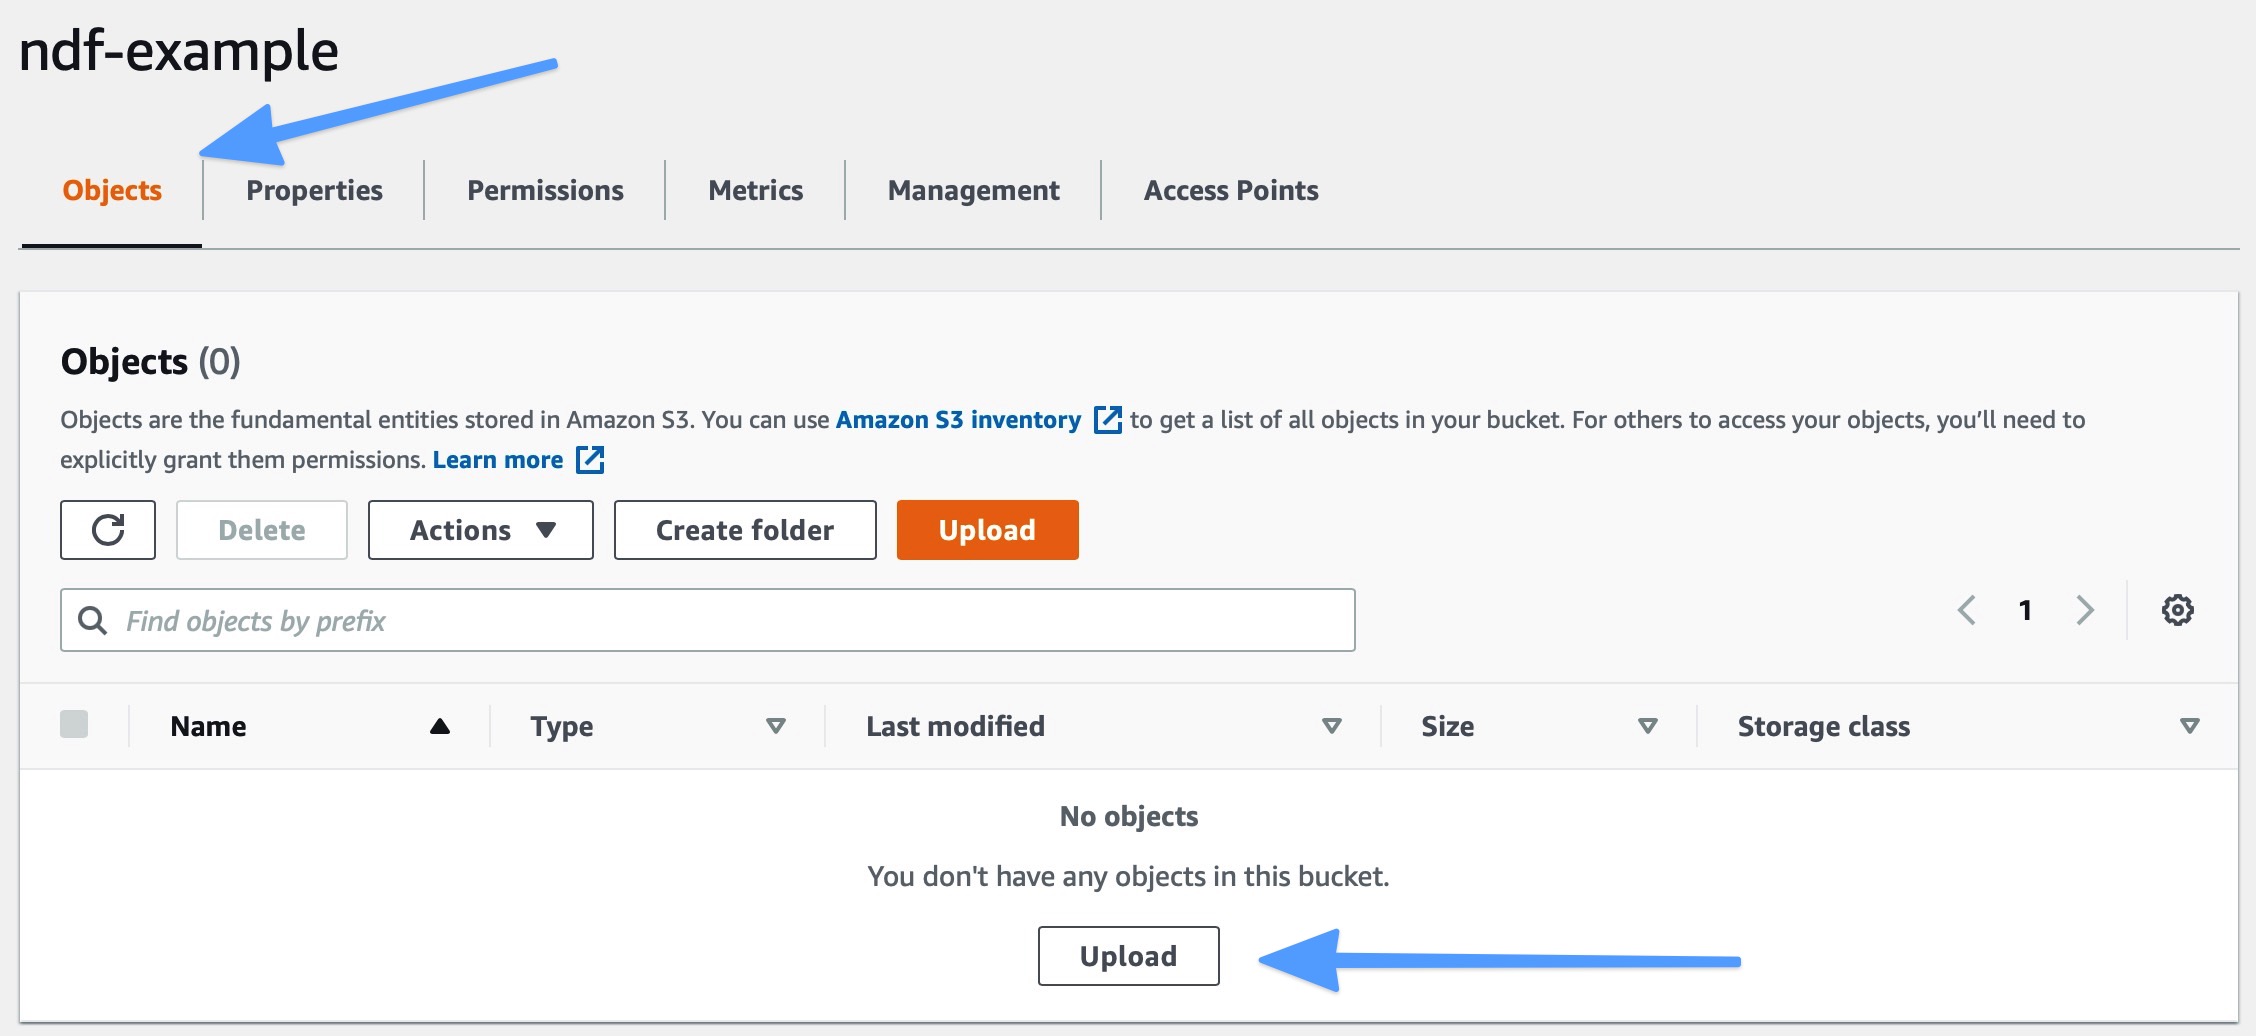
- Drag the index.html file from above into the page and click the Upload button at the bottom. Then click close on the upload status screen after the upload completes.
You should now see the index.html file in your bucket.
Add a Bucket Policy
This is the final step that will allow access to the objects in the bucket, making them available on the internet so people can see them.
- Click the Permissions tab under the bucket name at the top and scroll down to the 'Bucket policy' section. Click Edit and paste the following into the text area. Be sure to change the bucket name. Click Save changes.

This policy is allowing anyone (Principal = *) read access any object in this bucket. The 'Resource' value you see here is the ARN (Amazon resource name) for your bucket. You can verify you have the correct ARN by looking at the top section under the Properties tab for the bucket.
Test It!
You can always get the bucket website URL by going back to the Properties tab and looking at the 'Static website hosting' section. Click the bucket's website link, and you should see the 'Is it Friday?' message from our index.html file.
How to Configure CloudFront
Now that we know the site is working, we need to configure the CDN so that 1) the page loads fast because it is cached all over the globe close to your users, and 2) we can set up HTTPS.
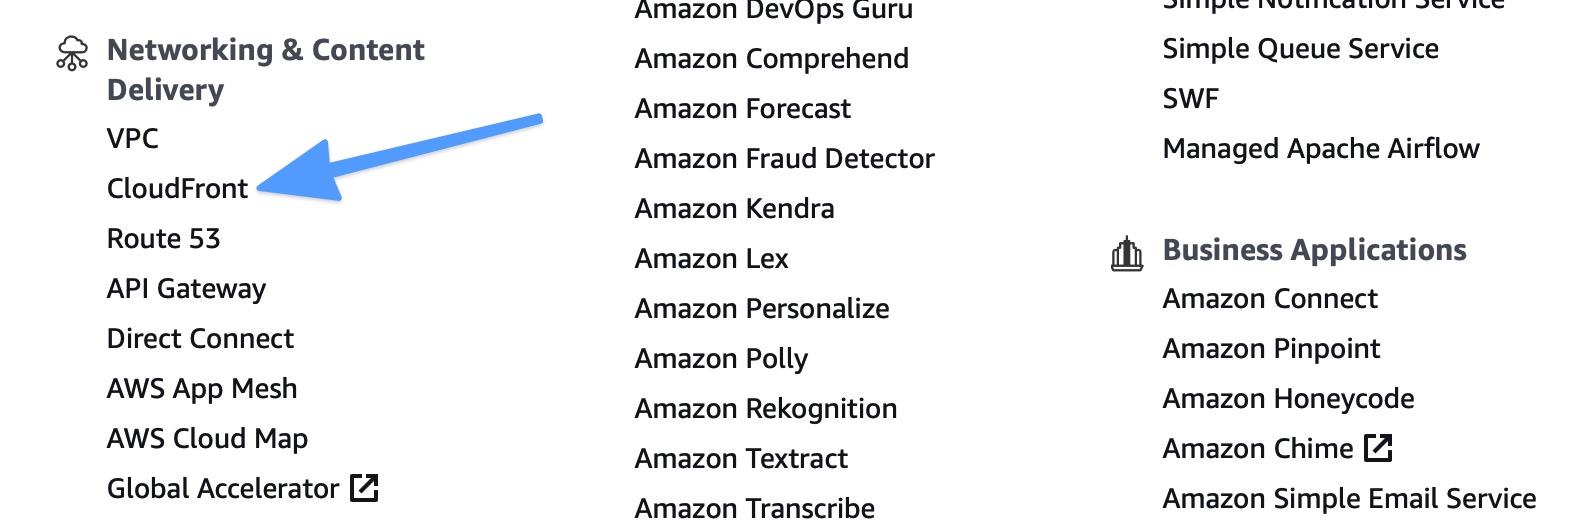
- Open the CloudFront page in the AWS console.
Here we will create a distribution that has uses the S3 bucket we created as the origin. This means that CloudFront will copy the content from your S3 bucket regularly out to all its edge locations. These edge locations are dispersed around the globe so that users anywhere will load the content quickly.
- Click the Create Distribution button. If you are asked to select a delivery method, choose Web and click Get Started
- In the Origin Settings section, click on the Origin Domain Name and TYPE the bucket website URL from the bucket we just created. DO NOT select it from the dropdown. (The bucket URL is available in the static website hosting section of the S3 console.)
This is where Amazon is just mean. When you click on the Origin Domain Name box, it gives you a nice dropdown of all the resources in your account that can be used as a CloudFront origin. However, it will display the wrong URL for your S3 bucket. Why? No one knows.
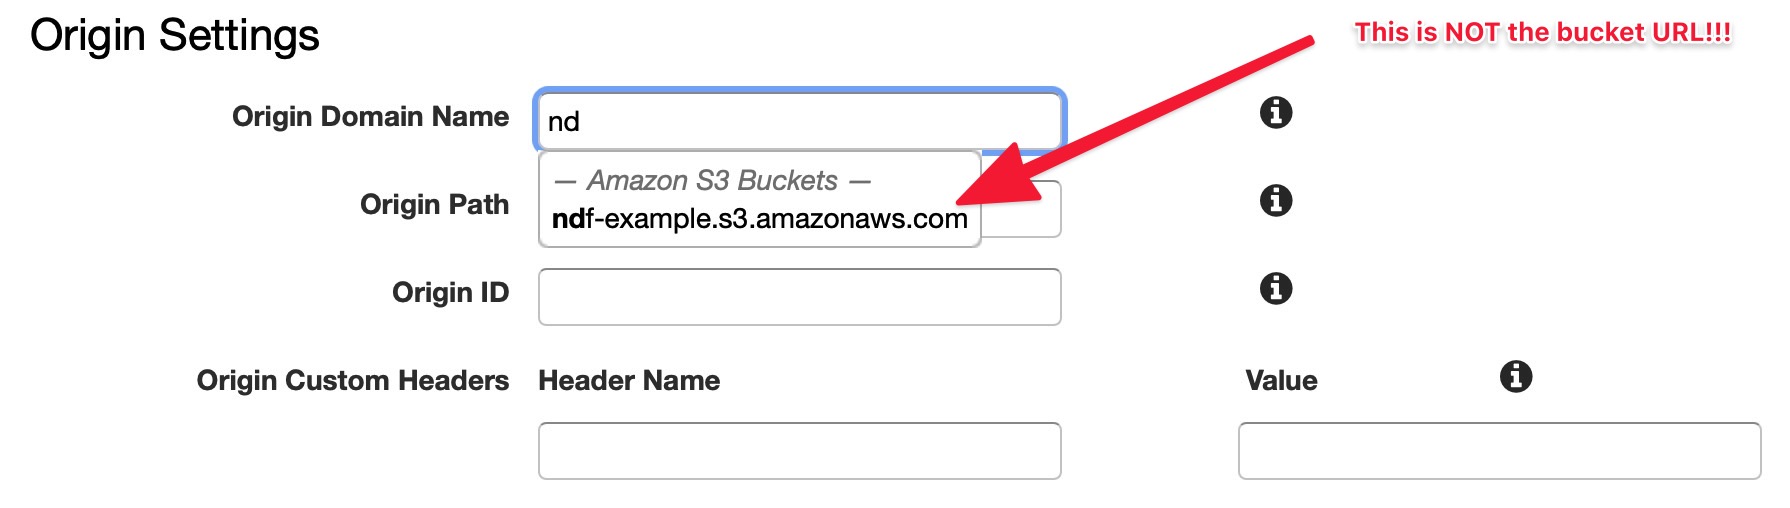
S3 Buckets that are configured for static website hosting have 2 URLs. One URL is for reading and manipulating objects in the bucket (all S3 buckets have this URL), and the other is for web hosting. Make sure you use the right one when configuring CloudFront.

When you properly TYPE the bucket website URL, the screens should look like this:
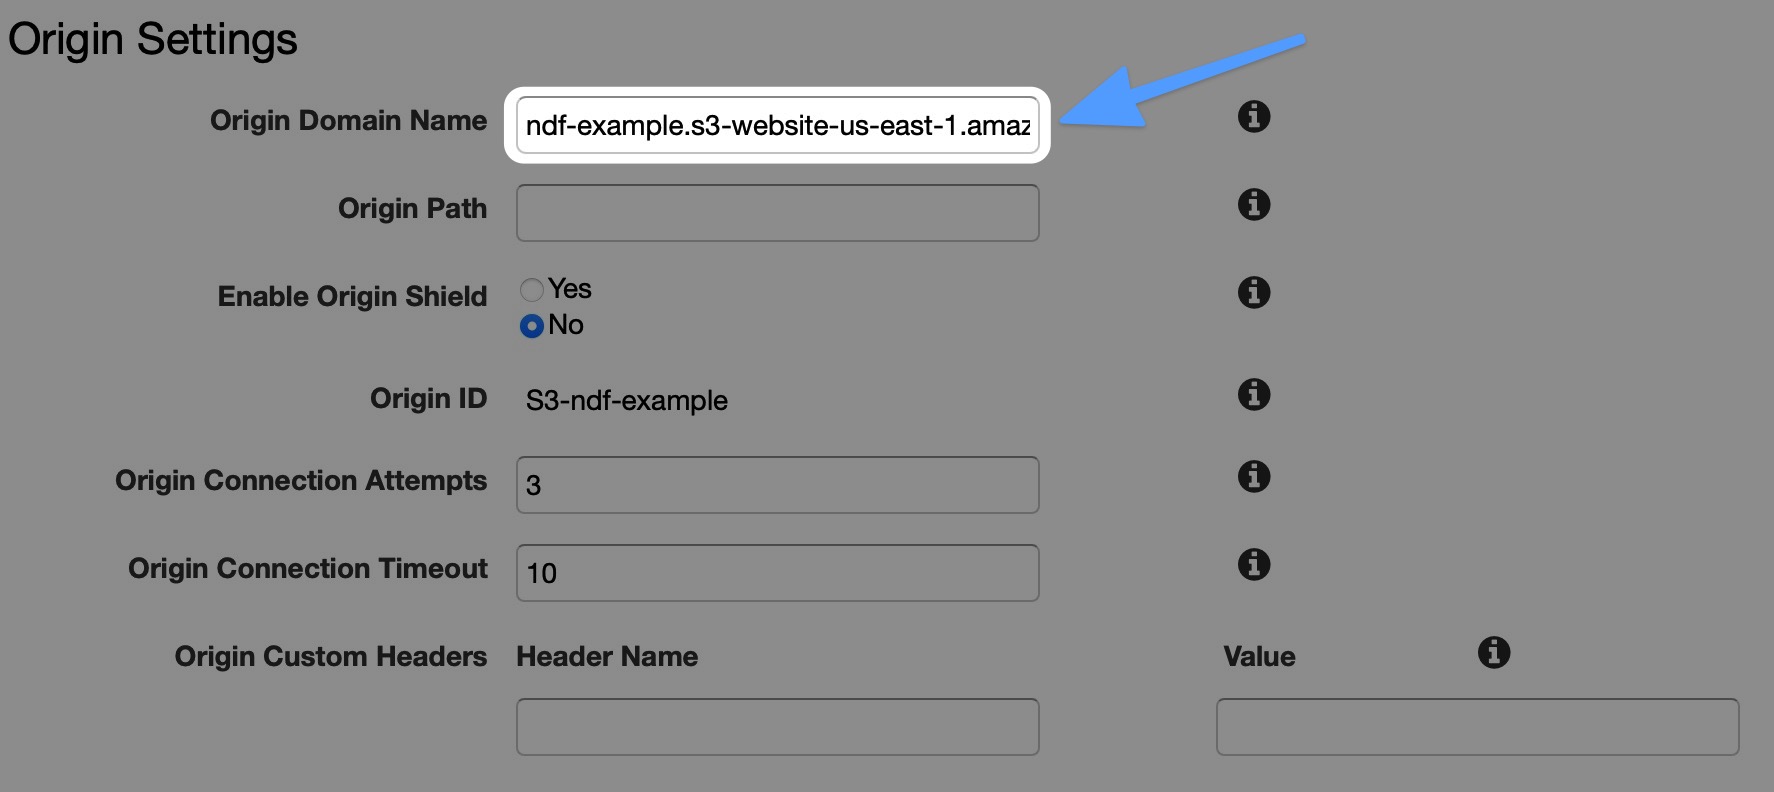
Leave everything else in this section set to the default.
- In the Default Cache Behavior Settings section, we need to change the Viewer Control Policy. Set this to Redirect HTTP to HTTPS. Leave everything else set to the defaults.
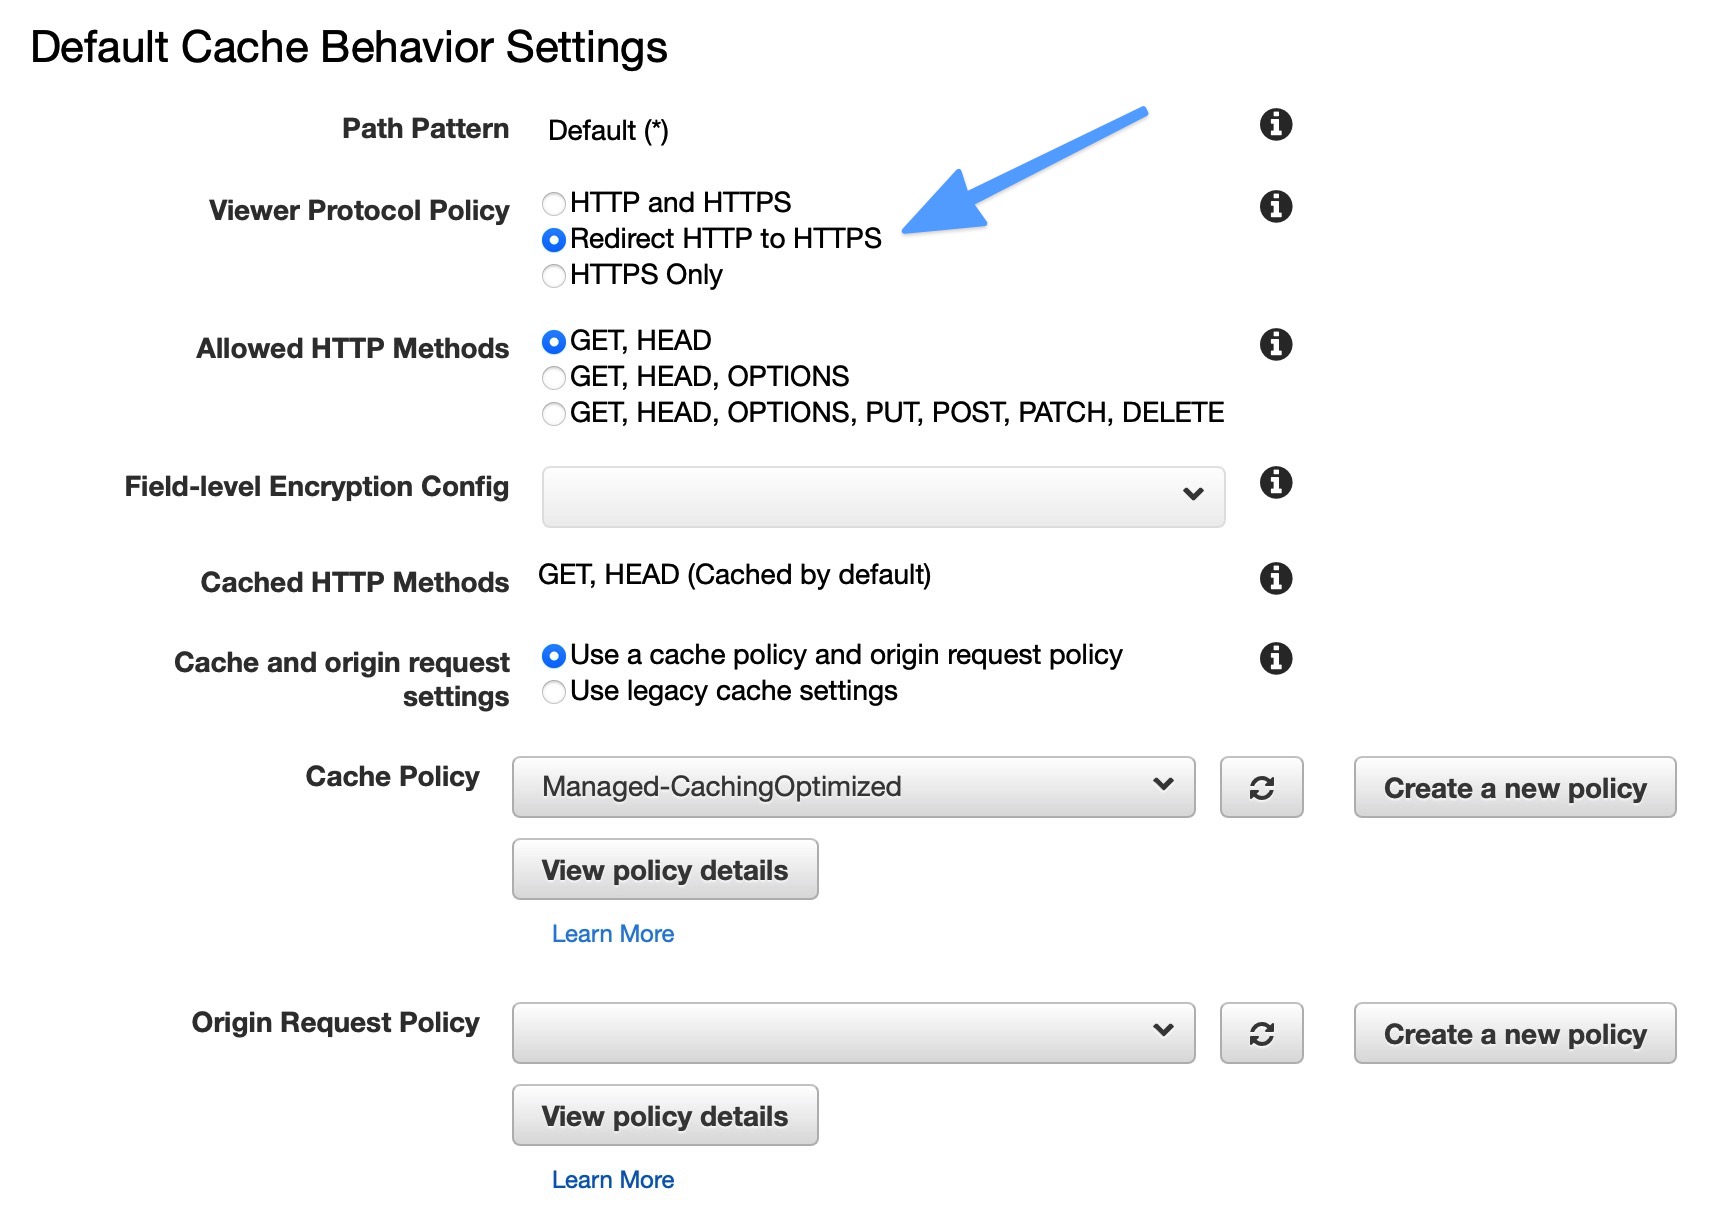
In the next section Distribution Settings, you will see domain and SSL Certificate setup. Leave this as-is for now, but we will come back here after setting up the DNS for your domain name in Route53. All of the remaining fields on this page can remain set to the defaults.
- Click Create Distribution at the bottom of the page. This will take you back to the main CloudFront screen, where you will see a list of CloudFront distributions (the one we just created may be your only one). Notice that the status says In Progress. This means CloudFront is copying your content out to the edge locations. This may take a few moments. When it is done, the status will change to Deployed.

6.Try it out! Now we have the S3 bucket serving your content, and we have it distributed on CloudFront. CloudFront creates a unique URL for your distribution. This can be found on the main CloudFront screen under the Domain Name column. It will look something like this:

Copy that into your browser and add 'HTTP://' in front. Success! You should see the 'Is it Friday?' message from our bucket.
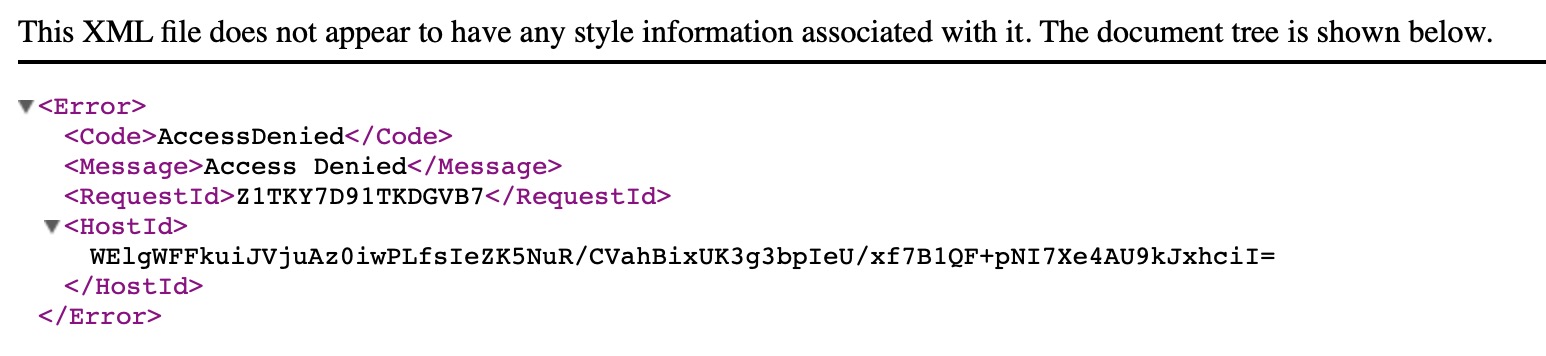
If you used the wrong S3 bucket URL, you might see an error that looks like this. If you see this error instead of the 'Is is Friday?' message, make sure you entered the S3 bucket website URL as described above as the CloudFront origin.
How to set up DNS (Route53)
For this part, you will need a domain name. If you don't have one, you can get one directly from amazon or through any other registrar. I use https://hover.com and highly recommend them (not an affiliate link - I just like them). Once you have a domain name, we need to get it set up in Route53. This will point your domain to the CloudFront distribution we just created. For this example, I will use a domain name that I have registered, but I am currently not using for anything: airgapped.org.
- Open the Route53 console

2. Create a hosted zone if you haven't already for your domain. Click on the Hosted zones link. Then click the Create hosted zone button.

3. Type in your domain name and click the Create hosted zone button. Make sure you only type in the domain name with its suffix (i.e., "mysite.com"). Do not include http or any subdomain or prefix like 'www.'
These steps will configure Amazon Route53 to serve as the DNS provider for your domain. You can use Amazon Route53 for DNS even if you registered the domain somewhere else.
The critical part is telling your registrar for the domain to use the AWS Route53 DNS Servers.
Route53 will create two records for your hosted zone. An NS record and an SOA record. The NS record gives us the name servers that we need to tell our registrar about. Make a note of these.

- Go to your registrar (like GoDaddy or Hover) and log in. The exact steps to do this will vary depending on which registrar you use. Find an option to manage your domain and where you can set the name servers. Add the 4 name servers you noted in the last step. Some registrars default to only 2 name servers but usually have an option to add more.
Note: DNS changes can take up to 48 hours to propagate. With Route53, I usually see the changes in just a few minutes, but depending on your registrar and other factors, this could take longer.
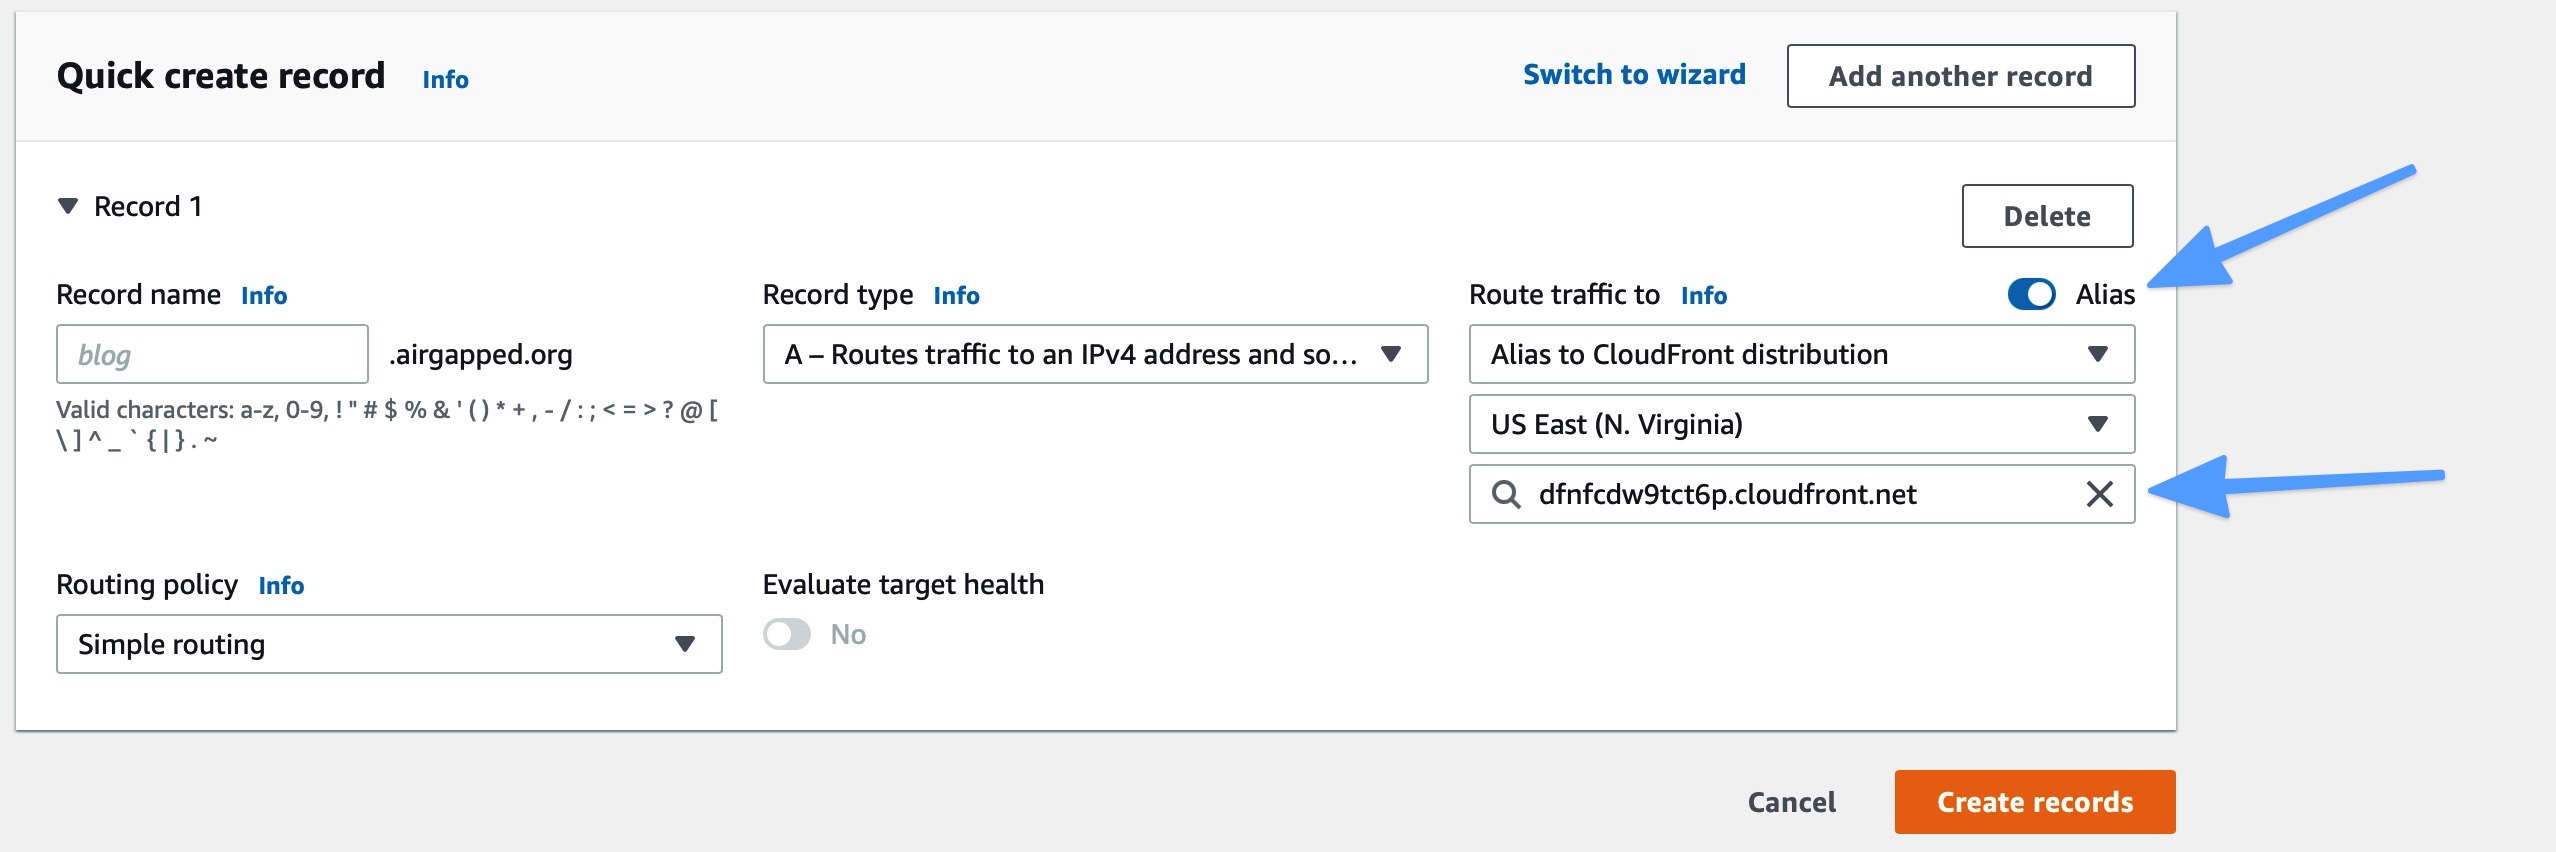
After the name servers have been set, go back to the Route53 console. Create an A record in Route53 that points your domain to the S3 bucket website endpoint.
- Click the Create record button. On this form, be sure to click the Alias button, select 'Alias to CloudFront distribution,' then copy in the domain name of the CloudFront distribution (i.e., d1p69etqhdf7ei.cloudfront.net). It will not automatically show you this as an option in the dropdown - I'll get to why this happens in a moment.
Now we have all the pieces: S3, CloudFront, and Route53. If you try to test your domain now, you'll get an error. The reason for this is that CloudFront is not configured to handle requests that match your domain name, and it does not have a valid SSL/TLS certificate that identifies it as a valid server for your domain (i.e., HTTPS still won't work).
** Let's fix this. **
Configure CloudFront for Your Domain
First, we need to create an SSL/TLS certificate for your domain. For this, we will use AWS Certificate Manager. Go back to the CloudFront console and select your distribution. On the General tab, select Edit.
- Under the SSL Certificate section, change the selection to Custom SSL Certificate. The dropdown will show you any existing certs you have in your account, but we will request a new one. Click Request or Import a Certificate with ACM. This will take you to the AWS Certificate Manager.
- In the certificate manager, add your domain name and add a wildcard additional name to cover subdomains. Use the Add another name to this certificate button to add a row. After you enter the names, click Next.
- airgapped.org
- *.airgapped.org
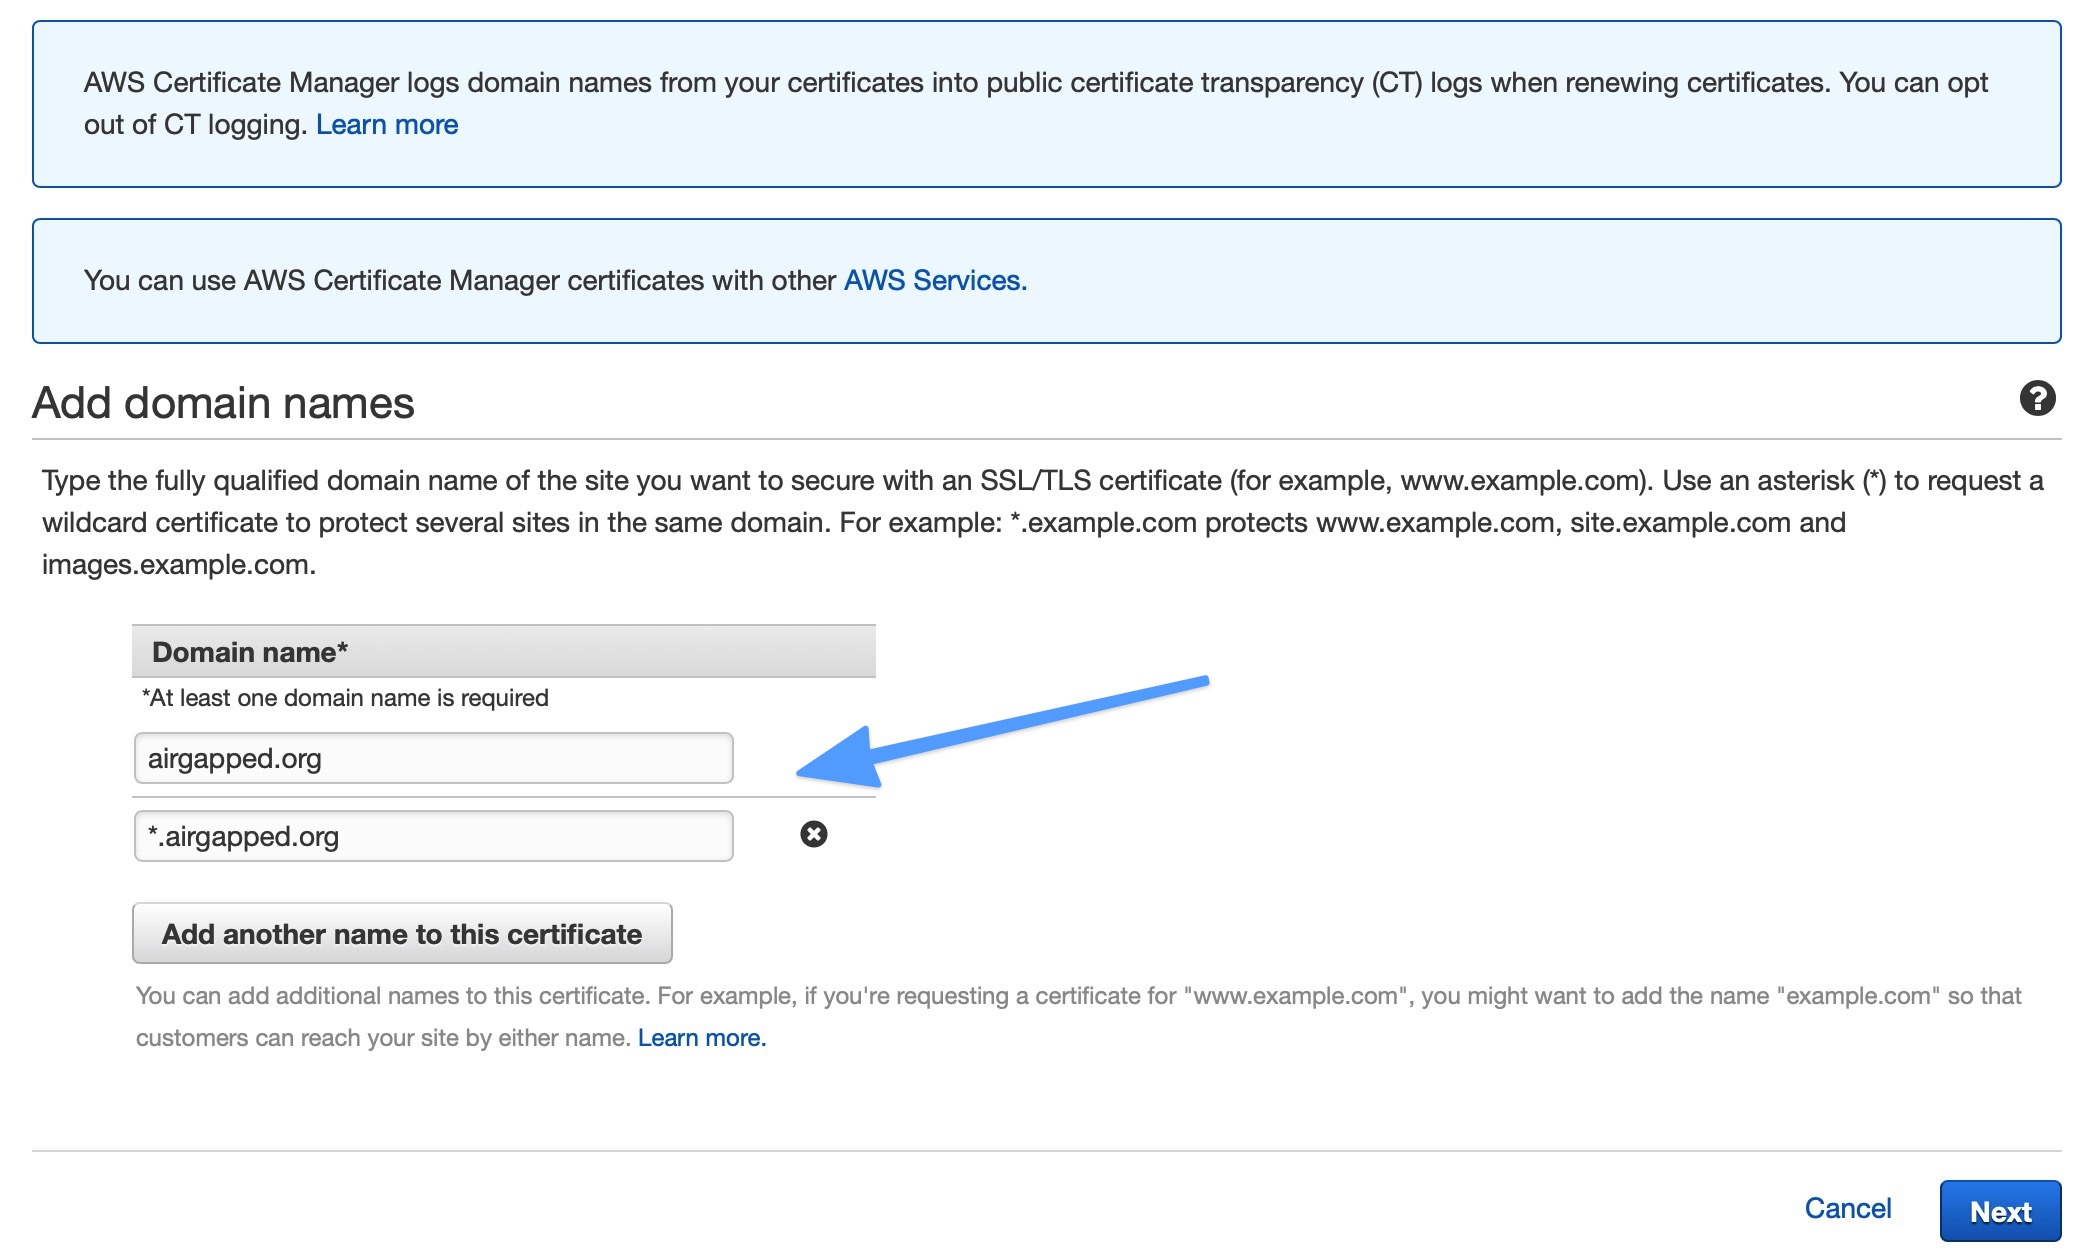
- Validate your certificate request. This is how Amazon knows that the domain belongs to you. ACM will give you the option of Domain validation or Email validation. Choose Domain validation and click Next. There is no need to add tags (but feel free to if you want). Click Review and then Confirm and request.
You should now see a verification screen that looks like this:
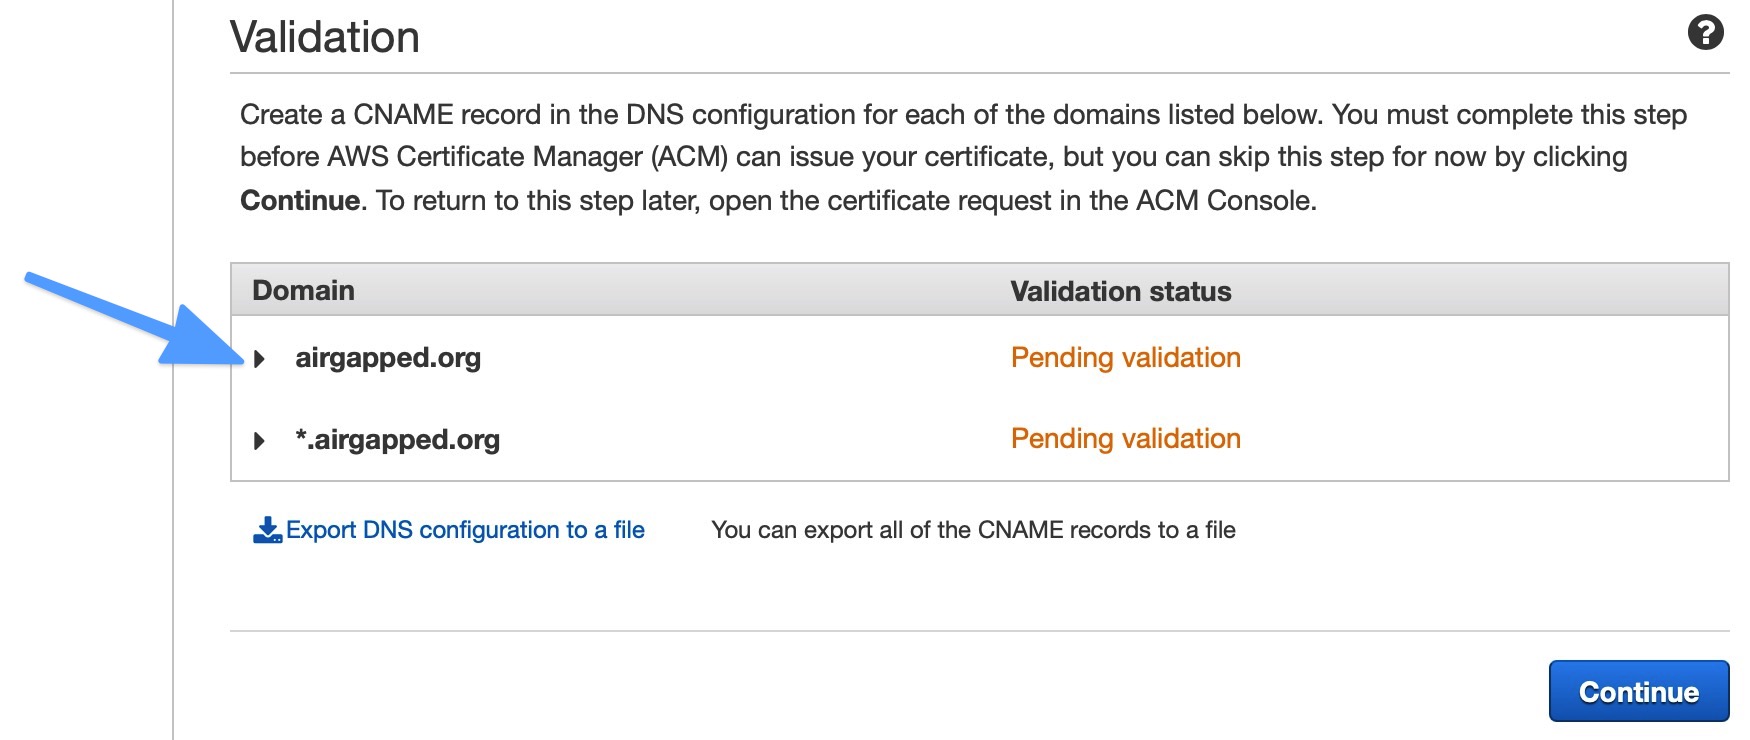
- Expand the caret next to either of the name rows shown (at the blue arrow in the screenshot above) and click the Create record in Route53 button. A confirmation screen will pop up confirming that you want to add a CNAME DNS record. Click Create.
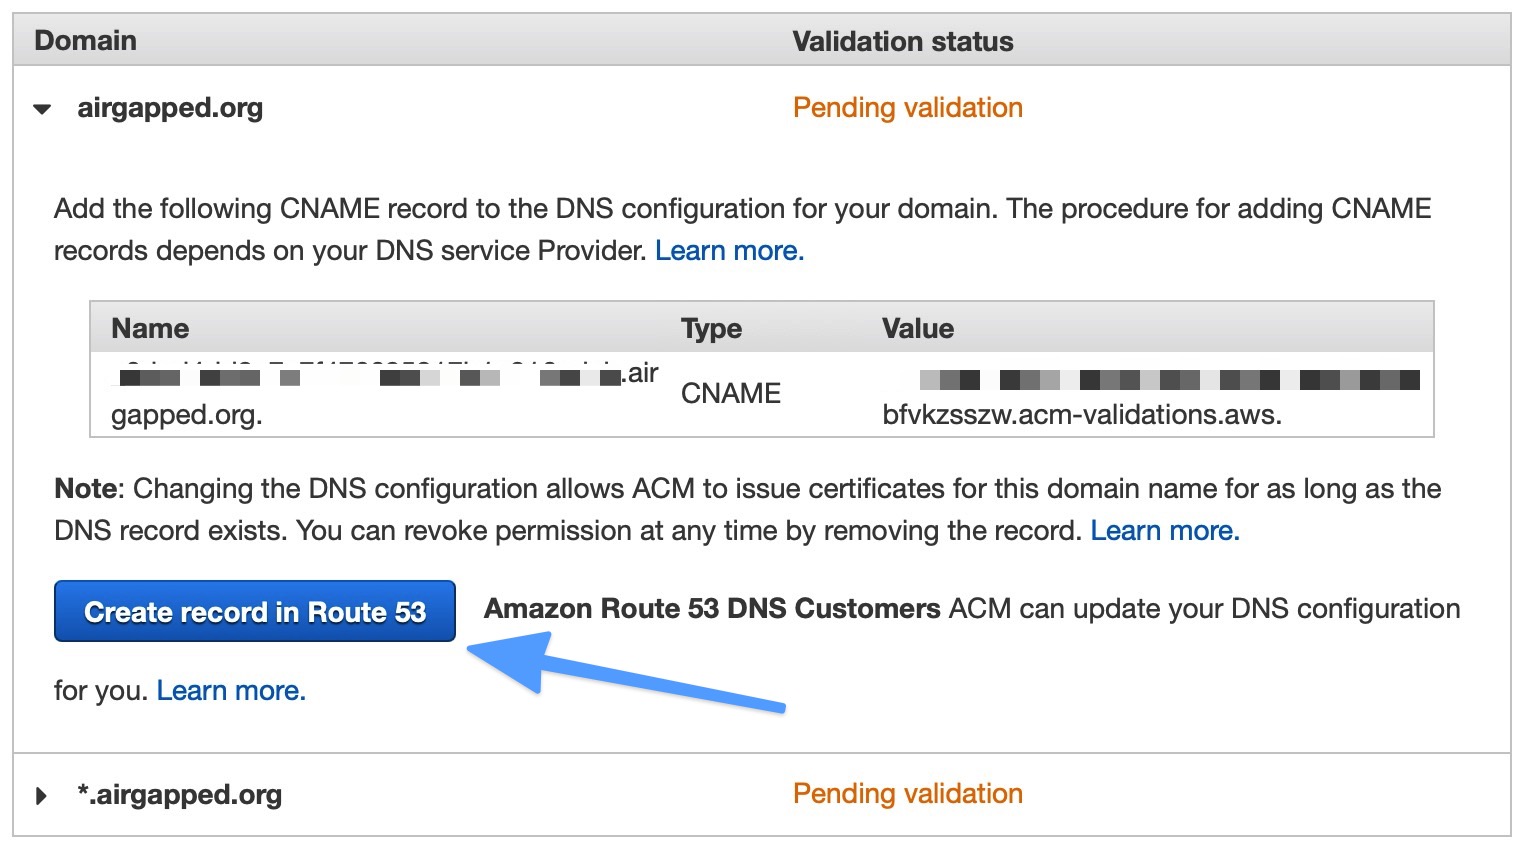
This automatically adds a DNS record to your domain that allows ACM to know you are in control of the domain's DNS. Since both ACM and Route53 are Amazon services, they've given us a shortcut. If you were using a different DNS provider, you would need to manually add the CNAME specified.
- Wait for the certificate to be issued. Amazon says this can take up to 30 minutes, but I usually see it happen much faster. While you wait, you can head back over to Route53 and make sure the CNAME record was actually added. Or you can keep checking the ACM console to see when the status changes from Pending validation to Issued. Use the refresh button in the upper right.

Once the certificate has been issued, head back over to the CloudFront console where you are editing the CloudFront distribution.
- In the Alternate Domain Names (CNAMEs) field, add your domain name.
- In the SSL Certificate field, make sure you have chosen Custom SSL Certificate and then select the newly issued certificate from the dropdown menu. Then click Yes, edit at the bottom.
That's it! You will need to wait a few minutes while CloudFront distributes changes. Once this is done, your site will be live!
Visit yourdomain.com, and you should now see the content from your S3 bucket. Notice that even if you type http://yourdomain.com, you will be redirected to https://yourdomain.com.
Recap
What we have just created covers the core concepts for static website hosting on AWS. This setup is what I recommend as the minimum setup on AWS.
- S3 hosts the website content
- CloudFront provides SSL/TLS (HTTPS) and global distribution
- Route53 links your domain name to the site.
Beyond this, there are several other aspects that you might be interested in depending on your particular use case.
Bonus Topics
1. SEO for WWW vs. non-WWW URLs
Remember typing www.whateversite.com in 1993? Well, www is still a thing. Since some people may arbitrarily add www to your website and some people will not, you should set up both. The best way to do this (that is also SEO friendly) is to pick your preferred form and 301 redirect the other one. Which form do you want to primarily use?
- https://www.mydomain.com
- https://mydomain.com
One way to serve the same content at both the www and non-www URLs is to use a CNAME alias record in your DNS. This is NOT SEO friendly. If you care about SEO for the site you are running, do NOT do this.
A CNAME DNS record aliases one URL to another. This is NOT the same as a 301 URL redirect. 301 redirects are issued by the web server and tell web browsers (and search engines) the actual location of the desired content. When you use a CNAME alias, you are effectively serving the same content at 2 different URLs. This is a big no-no for SEO. Search engines want to know where the one source of truth is for a piece of information. If you are serving this information at 2 different places, it can confuse Google, Bing, etc., and you will not get as much organic traffic to your site.
What should we do instead?
The better way to handle this is to make sure one URL always 301 redirects to the other. If you were running a traditional web server, you would configure this in Apache, Nginx, IIS, etc. We are using S3 buckets as our web server, though, so what can we do? There are 2 options:
- Use S3 bucket redirect with separate CloudFront distribution
- Use a lambda edge function to issue the redirect
Option 1 - To enable the 301 redirect using the CloudFront/S3 method, here's what you need to do:
- Create a new S3 bucket (the name shouldn't matter, but this bucket represents your www endpoint, so name it appropriately). Enable static website hosting as we did on the original bucket above. This time set the Hosting type to Redirect requests for an object and set the Hostname field to match the original bucket name.
- Create a new CloudFront distribution that points to this bucket. Be sure to add the www version of your domain URL to the Alternate Domain Names (CNAMEs) field on the distribution. Also, select the SSL certificate we created above.
- In Route53, create a CNAME record that points the www version of your domain to this new CloudFront distribution.
Option 2 - To enable 301 redirects using lambda edge is a bit more complicated, and I will cover this in another article.
Both of these options appear to the browser (or search engine), like the "webserver" is redirecting requests to the one source of truth. This will help ensure your site gets the right SEO credit and ranks appropriately.
2. Logging
Traditional web servers generate access logs for you to use when troubleshooting and/or securing your system. When using S3 as our web server, you don't automatically get this logging feature. We are also using the CloudFront CDN, so most users will only hit the CloudFront edge. This means that the S3 bucket will not see any activity from most individual users loading your site. The S3 bucket should only see requests from CloudFront to refresh its cache.
You might consider enabling the logging on:
- The CloudFront distribution
- The S3 bucket
CloudFront logging will give you the most information, so I recommend enabling that. CloudFront offers 2 types of logging:
- Standard Logging - This is free to add to CloudFront but delivers the logs to an S3 bucket (a different bucket than the one we set up for static website hosting), so you can get changed for S3 storage (especially if you never delete the log files). Events are batched and can take a long time to show up in the S3 bucket.
- Real-Time Logging - This option uses AWS Kinesis streams to deliver log events in real-time. This option does have additional costs associated with it and is not necessary for most use cases.
Standard logs will meet most needs. To enable standard logging on the CloudFront distribution, do the following:
- Create a new S3 bucket. All the default settings are acceptable here. You may want to add a lifecycle rule that automatically deletes old files.
- In CloudFront, edit the distribution and set Standard Logging to On, and set the name of the bucket you just created.
Give it a few minutes, and you should see logs appear in the bucket (if the site is getting traffic - you probably need to go load the site a few times to trigger some logging)
3. Restricting Access to the Origin Bucket
At the beginning of this article, we created an S3 bucket, opened up permissions, and set everything to public. This allowed us to access the bucket directly but also lets everyone else access it directly also. If you want to prevent direct bucket access (also forces users to access the site using HTTPS), you can use origin custom headers.
You may be aware of another mechanism to protect S3 origin endpoints called Origin Access Identity. This is used to secure access to the S3 bucket's API endpoint and CANNOT be used to secure the S3 bucket's website endpoint.
The custom header approach configures CloudFront to send a "secret" header when refreshing content from the S3 origin bucket. The S3 bucket is configured only to accept requests that have this secret header.
To set up origin custom headers, you can do the following:
- Configure your CloudFront distribution to add the secret header to origin requests. You can do this by going to the Origins and Origin Groups tab in the CloudFront console. Edit the origin, add a header like Referer, and set the value to a really long random string.
- Go to the Permissions tab in the S3 Console and remove all public permissions. Then add a bucket policy that only allows access with the Referer header we created in CloudFront. The policy could look like this:
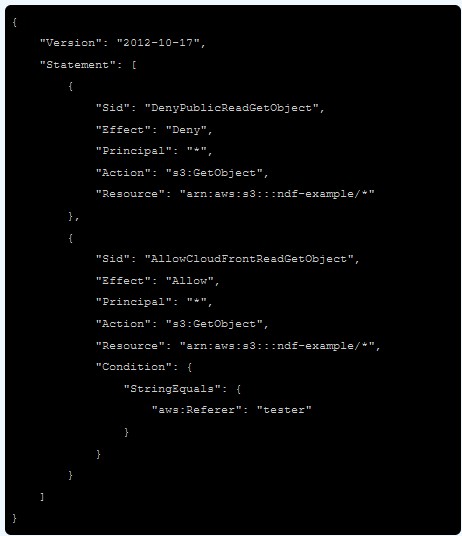
That's it. If you try to access the bucket website endpoint directly, you should see a 403 Forbidden response. If you visit the site at your domain URL, it will still work fine.
Conclusion
I hope this article helped you set up your website for static website hosting on S3. Even though this was a pretty long and detailed article, there are many more details about website hosting on S3.
A few additional topics I did not get to cover in this article are here:
- How to configure subdomains
- How to automatically deploy updates the site
- How to handle dynamic content
- Cache configurations - make your site load faster
- Browser caching options
- CloudFront caching options
- Restricting access to some files
- Cross-region replication
- Private S3 Sites
- Adding Security Headers w/ Lambda Edge
- Setting up 301 Redirects w/ Lambda Edge
I will write about some of these topics in the future. Which one is of most interest to you?


