If you have already deployed complex applications in Kubernetes, you may have noticed how many different resources you need to deploy and interconnect just to make them work (and thus, this post is going to be just too easy for you). If you’re new to Kubernetes, this post will help you to have a quick overview on how an application is deployed into a Kubernetes cluster, and how every single component works and interacts with each other. However, this post is not focused on Kubernetes architecture and its underlying infrastructure. We will take that ‘for granted’ and just assume virtual pools of computing, networking and storage resources that can be used by our application.
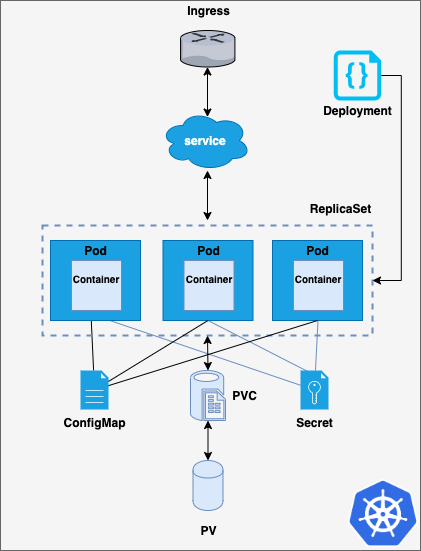
In the image below you can find a simplified deployment in Kubernetes: a simple web server, an Apache web server specifically. As it can be seen, it is made up of a lot of different pieces, being each one of them a Kubernetes object. Let’s break down their functionality.
NOTE:The manifests (Kubernetes yaml files) developed to set up this application are reviewed in the post, and they are available to be downloaded in case you want to deploy the same environment. It’s a good way to better understand the resources we will discuss here 😁.
Pods, ReplicaSets and Deployments
First of all, we find containers, which are run either using the ‘traditional’ docker daemon or some other container runtime. Container runtimes are the intermediate layer between containers and the underlying operating system, which in turn, provides access to the shared physical resources. Containers can be used, for example, to encapsulate a microservice or an entire application, as in this case, a web server.
Containers are placed within pods, which are Kubernetes objects that allow them to share storage and network resources. Pods are the minimum schedulable units in Kubernetes. Alongside pods, ReplicaSets can be used. ReplicaSets are Kubernetes objects which are in charge of keeping a desired number of identical pods running.
On top of ReplicaSets, Deployments introduce an additional control layer, allowing to scale up and down the number of replicas running in a declarative, controlled way. Thus, using Deployments is easier than directly defining ReplicaSets. Besides, Deployments provide some other interesting features, such as rollback to previous Deployments or several update strategies, including rolling updates. In the code snippet below, you can see a Deployment which declares a ReplicaSet with 3 replicas for the pod containing the httpd docker image. The container exposes the apache http server on port 8080.
Storage, ConfigMaps and Secrets
Files served by the web servers within the pods and their configuration files must be placed somewhere right? Remember that data which is not contained in the docker image and that is generated during runtime will be lost if it’s not stored somewhere else!
Then, what are exactly the storage resources that can be shared amongst the containers in Kubernetes? Well, for this example we are considering the three main ones:
- ConfigMaps: They are key-value pair dictionaries. They are mostly used for configuration data. In the example below a key env is created and it’s given the value test.
- Secrets: They are similar to ConfigMaps, but they are intended for sensitive data, such as passwords or tokens. Data stored within secret is base64 encoded.
- Persistent Volumes (PVs): They are abstractions of underlying storage, either physical or logical. They are intended for persistent data storage that would be flushed if the docker image was restarted. Persistent Volume Claims (PVCs) allow pods to request these provisioned volumes.
When working with PVCs, PVs can be provisioned either statically or dynamically. Static PVs are created by cluster admins, which usually create several PVs in order to be consumed. These PVs are requested by means of PVCs and if the requested storage and access modes match, the PV is bound to the PVC, and the pod can then mount it. Dynamic storage provisioners, analyze each claim and provision the requested volumes on demand (if possible), rather than relying on previously provisioned volumes.
The following code snippet generates a claim for a volume of 1Gi size, which can be mounted by the node (underlying host) in read-write mode by a single node at a time.
There are two other access modes that can be used when requesting a PVC:
- ReadWriteMany: volumes are mounted in read-write by many nodes
- ReadOnlyMany: volumes are mounted in read-only mode by many nodes
Services and Ingresses
How to expose and access these pods? Here is where services and ingresses are needed:
- Service: It’s an abstraction which allows to access a set of pods by means of a selector. It decouples the pods and containers from those other services using them, eliminating the need of knowing the IPs of each Pod. Furthermore, it balances the incoming traffic between the pods when several replicas are used. The service spec below sends traffic to all the pods with the label app=apache to port 8080. The targetPort field specifies the pod in which the pod will be listening, whereas port field can be used as a redirection towards the targetPort.
- Ingress: It routes HTTP(S) paths to Kubernetes services. It relies on an ingress controller, which typically uses an external load balancer. Ingresses usually provide additional features, such as path rewritting and load balancing. There are quite a lot ingress controllers that can be used, and selecting the right one it is not an easy task, it strongly depends on your requirements. Some of the most used ingress controllers are NGINX, Traefik, HAProxy and Istio, which actually offers way more functionalities that just an ingress controller. The example below shows the definition of an ingress object for a NGINX ingress controller. It redirects all the traffic sent to the route path /webserver to the previously defined service.
Let’s integrate all the pieces in our deployment!
Well, now that we have defined several resources for our Deployment, is time to update our file to use all of them. The full Deployment yaml file mounts the created secret as a volume, meaning that the content of the same will be available in /etc/usrpwd within the containers. However, ConfigMap data is used in a different way here, the content of the key env is passed to the containers as the environment variable ENV_VAR. Finally, the volume generated by the PVC is mounted in /app, where the web content is to be stored. As the PV is mounted by all the containers, files placed within the path will be served by all three of them. Note that there’s an additional ConfigMap which contains a simple bash script to use the secrets and the environment values to customize the served index page.
The script (script.sh) is defined within a ConfigMap and mounted in the path /home/script. Note that permissions for the same can be specified while mounted, via the defaultMode directive. Analyzing the bash script, it can be noticed that each particular key of the secret is accessible as an individual file in /etc/usrpwd/username and /etc/usrpwd/password.
What can I do with all these YAMLs?
Let’s put the concepts we have just discussed into practice. You can find the entire example code in k8sbasics repo. If you want to try it in your own computer you should first install Minikube. Once you get it, just follow the commands below.
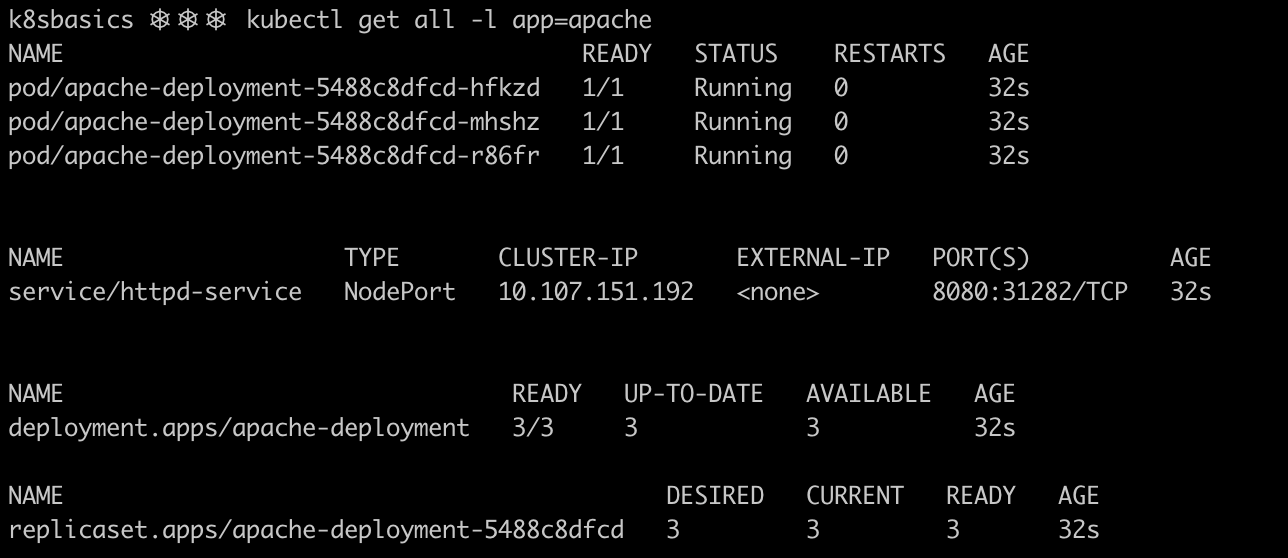
After applying the Kubernetes manifests, resources will be created on the cluster. The image below shows some of the main resources defined. Three pods were created, each one containing a single container. Note how the ReplicaSet keeps track of the desired number of pods and the number of pods that are currently running and ready.
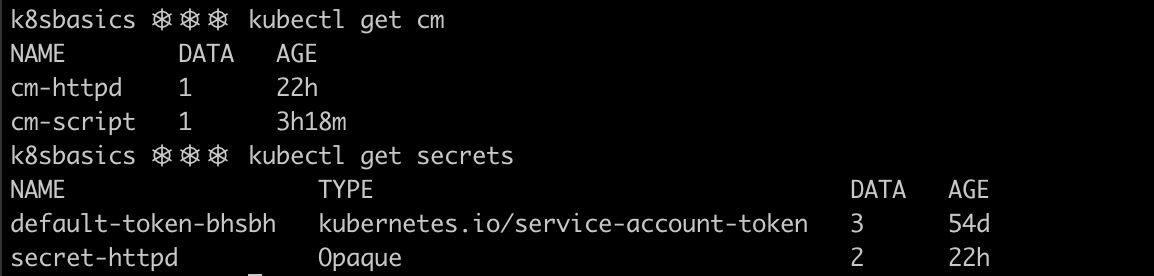
Secrets and configMaps are present in the cluster too:
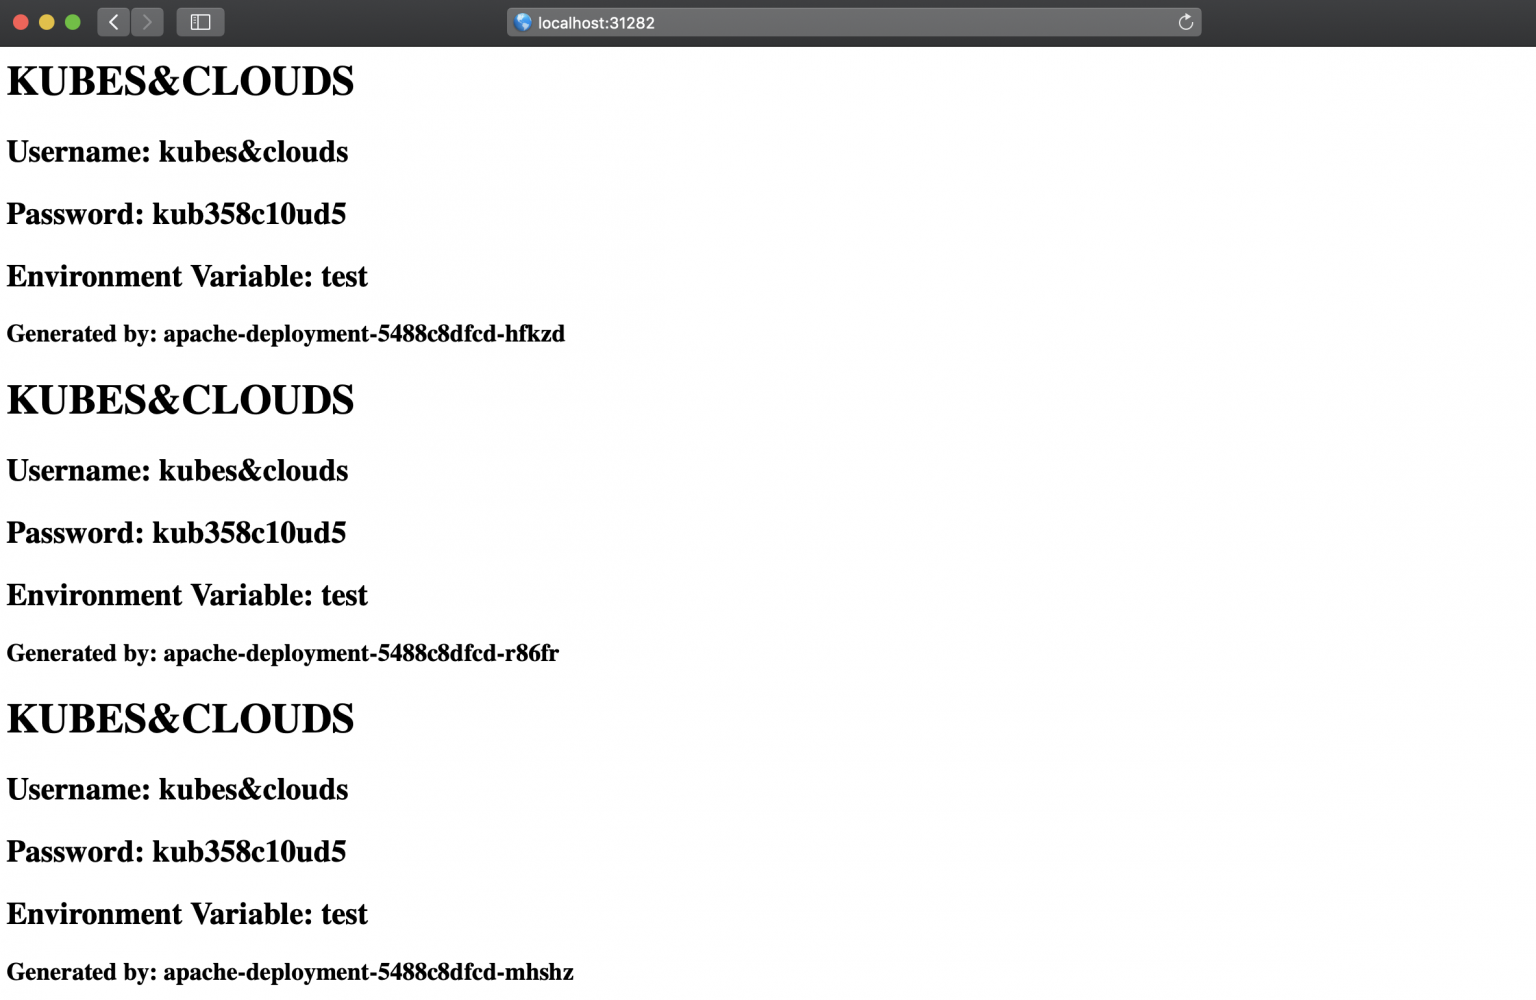
NOTE: For this example to run and in order to make it accessible from your own web browser, there is a slight modification regarding the service. In this case, we will be using the service type known as NodePort, which attaches a port of the underlying host where the pod is run to the service. Thereby, by using your own IP (or localhost) and this port, the application can be tested.
Voilà! As explained before, thanks to the NodePort, we can access the web server app via localhost. Note how each single container (the pod name is directly shown on the web-page) read exactly the same data, both from the ConfigMap and the secret, and wrote it to the common PV, so that all three containers serve the same content.
Extra: What about persistent applications?
There are some situations in which Deployments are not a suitable solution. All the pods in a Deployment are created from the same specification and they are interchangeable in terms of scheduling. This means that there is not a specific ordering between pods. Thus, stateful applications in which each pod needs to be uniquely identified, even if they are recreated, can’t be implemented this way. StatefulSets are used for this purpose. They assign a unique and incremental number to each pod created, starting from 0, which is used to generate also unique network IDs. When a StatefulSet is applied on a cluster, it creates the pods and its associated resources in order, starting by 0, and if any of the pods fails, it won’t deploy the next one.
Furthermore, a StatefulSet ensure data persistence even when it is deleted or scaled down, as the storage volumes associated to pods will remain unless they are explicitly deleted. There is an important difference between StatefulSets and Deployments in terms of persistent volumes: as pods get unique identifiers when created form a StatefulSet, some of their associated resources such as PVs and PVCs also do. Thus when using a StatefulSet with N pods, N different volumes will be mounted. Conversely to what we saw in our example, pods will not share the same volume, as you can see in the image below.

We’ll discuss StatefulSets in upcoming articles, but for the moment, just keep in mind the main differences with Deployments.
.jpeg)


