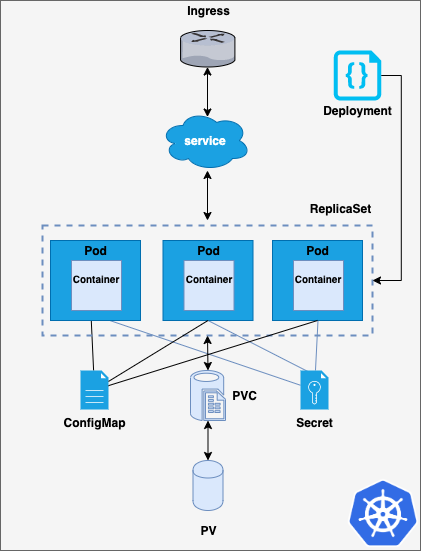
In a previous post, we discussed how to deploy a simple application in Kubernetes, and yet being ‘simple’ we could notice how many different pieces were needed to make a deployment run successfully. Every one of these single pieces can be placed on a separate configuration file to make it easier handling and maintaining the code. Thus, for the deployment we worked on on that post, and whose architecture is shown in the image below, seven different manifests (yaml files) were needed.
Kubernetes does not offer a native templating way for these yaml files, so if we wanted to modify common parameters such as labels, we would have to alter them in each single file. Furthermore, if this application was to be deployed in different environments, manifests should be modified accordingly to each environment’s requirements.
Then, how to solve this limitation? A templating language is needed, and of course, there are some tools to help us with that. Kustomize and Helm are the main two ‘add-ons’ used for templating in Kubernetes, being Helm a much more powerful tool, as it also provides package management for the Kubernetes set of manifests composing an application, among other useful features, that we will discuss in this post.
Helm offers templating capabilities by means of Go language (golang) syntax, version tracking of each deployment in a cluster, and some other interesting utilities, which make Kubernetes applications development, easier, faster and more flexible.
In order to better understand how to transition from simple Kubernetes manifests to Helm charts, the same simple application that was developed for ‘Understanding Kubernetes Deployments’ has been adapted so it can be deployed using Helm. You can access the original manifests here.
In case you’re wondering about the origin of its name, you just need to know that Kubernetes means helmsman in Greek. Now it all makes sense!
Charts
Helm organizes Kubernetes yaml manifests and some other required files in what are known as charts. Charts follow a particular structure, with a set of directories located within the main directory, which is named after the application.
Kubernetes files are placed mainly within /templates and /crds directories. Charts can contain nested charts within themselves, which are located in the charts/ directory. However, other charts can also be dynamically linked by using the dependencies directive in the Chart.yaml file. Helm offers a specific command to fetch all the dependencies defined in this file prior to rendering the deployable objects.
Chart.yaml is the file that contains the data which identifies the chart, such as the version, maintainers, keywords and a short description. As commented before, it can also be used to specify chart’s dependencies. The example below shows a complete Chart.yaml file for Grafana’s Helm chart.
The values that will be substituted in the templates are stored in a file named values.yaml. These values are substituted by using Go expressions and interpolations within the Kubernetes yaml files. Values are specified as in the snippet shown below, and they can be accessed from the Kubernetes yaml files by means of the object .Values. They are accessed following the same order in which they are defined, which is known as namespaced strategy. Thus, the docker image tag (2.4.41-debian-10-r29) can be accessed as .Values.image.tag.
Templating with Go
As previously mentioned, Helm relies on Go, a statically compiled language for values substitution in the manifest files. But it doesn’t just substitute values; several functions can be used to interpolate and mangle these values, and it also provides control structures, to implement conditional clauses and loops, as well as some other special functions.
The snippet below shows a conditional if statement, that will be executed if ingress.enabled value is set to true. Notice how Go expressions are placed within double curly brackets. Values are substituted from the ones defined in the values.yaml file. If the value doesn’t exist, the rendering process will generate an empty output, and in some cases, this can lead to errors when deploying the rendered files into a cluster.
Did you notice the – symbols within the Go expressions? These are used to remove the whitespace characters before the expression ({{-) or after it (-}}) when it’s computed.
Helm also offers a pretty useful option to iterate over a given list of values. Let’s check this example, from the official Helm documentation. It features pizza and its ingredients, way more interesting that a Kubernetes ingress and its paths 😅. Notice how a list of values is defined within pizzaToppings.
By using the range function, the pizzaToppings are printed within the ConfigMap data. Notice some additional functions in this example below. The quote function wraps the output using double quotes, and the default function defines a default value in case drink is not set, which may solve some issues with empty fields in Kubernetes manifests. Functions can be combined into a pipeline by means of a pipe, in the same way bash commands do. The title function converts the value of pizzaTopping into title case, and the upper function converts the output of food into upper case.
Variables can be also used. They are defined by means of $variablename:= and they can be accessed from any context.
Besides, it is possible to create files which contain templates and functions, that can be accessed from every other file in the chart. The name of these files begin with an underscore character, and they are not considered as Kubernetes manifests. By convention, these templates and functions are placed in _helpers.tpl, but you can use the name you prefer for these files (don’t forget to use the leading underscore character). The snippet below defines a function which outputs a set of labels, containing the name of the generator, a static value, which is ‘helm’, and the creation date, which is computed by means of a pipeline when the template is rendered.
Since this template can be accessed from other files, it can be referenced with the template function. In the snippet below, mychart.labels will generate the labels for the ConfigMap using the function previously defined. Notice how this example also features a much more elaborated usage of the range function alongside variables.
There are quite a lot of interesting functions and advanced techniques to make Helm templating even more flexible. If you want to know more about them, the official Helm chart template guide is worth a read, as well as their charts best practices.
Chart repositories
Helm also offers a chart repository service. A chart repository stores packaged charts that can be retrieved by means of Helm. Several repos can be added to Helm, and they can be used to search a specific chart and version. Helm’s official chart repository is known as Helm hub, and it is maintained by the Kubernetes charts. Additional repositories can be added in order to extend the range of applications that can be deployed with Helm.
Besides, it is pretty easy to create your own charts repository, as there are several tools that support Helm repositories (both open source and proprietary). Furthermore, an AWS S3 bucket or a GCP GCS bucket can be converted into a chart repository by adding a specific plugin to Helm. This is due to the simple structure of a chart repository, which is nothing more than a HTTP server with index.yaml file and a set of packaged charts. The index.yaml file contains metadata about the different packages stored in the repository, including the metadata defined in each charts Chart.yaml file. Every time a new chart is pushed into the repository, the index.yaml file gets updated.
Helm works as most package managers do. Repositories can be easily added and updated. For this example, Helm v3 client is used.
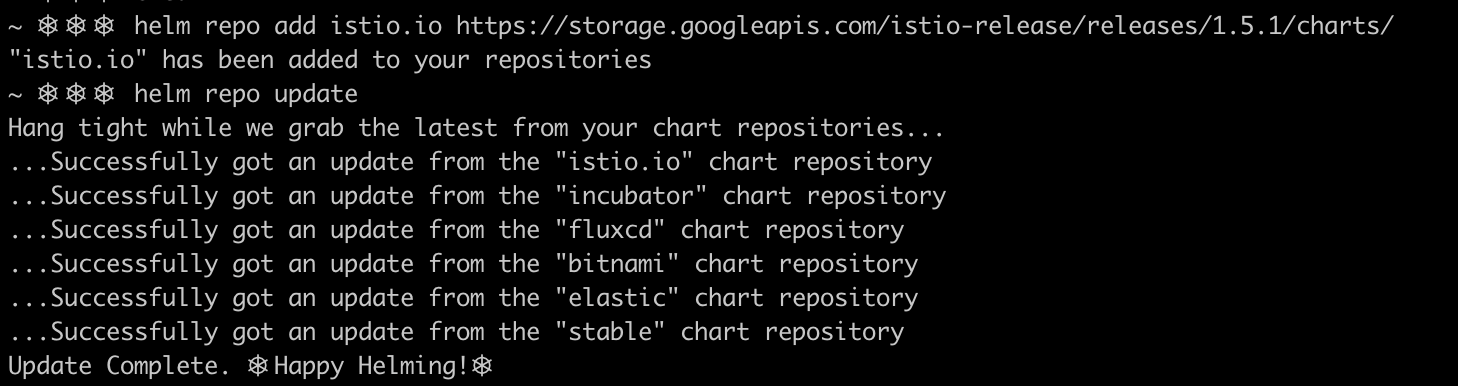
Once a Helm repo has ben added, packages can be be searched by its name, and fetched to your local computer.

As it can be seen in the image below, the full chart has been successfully fetched and decompressed (–untar flag).
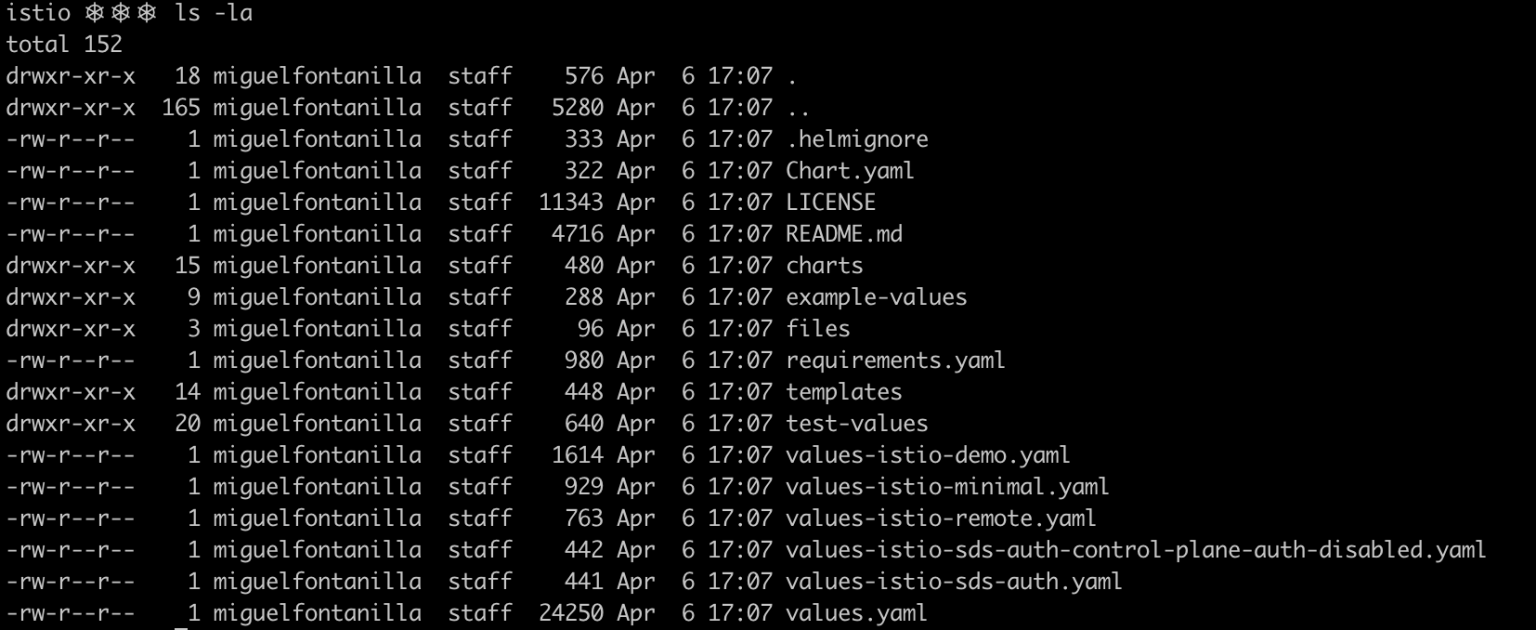
Did you notice the .helmignore file? It is used to tell Helm what files not to include in the Helm package. Its format is pretty simple, and files or entire paths can be specified. It supports unix glob matching.
Finally, how can we push a Helm chart into a charts repository?
First, the chart needs to be packaged, and once the .tgz file is generated, it can be pushed to the charts repository.
Helm & Tiller
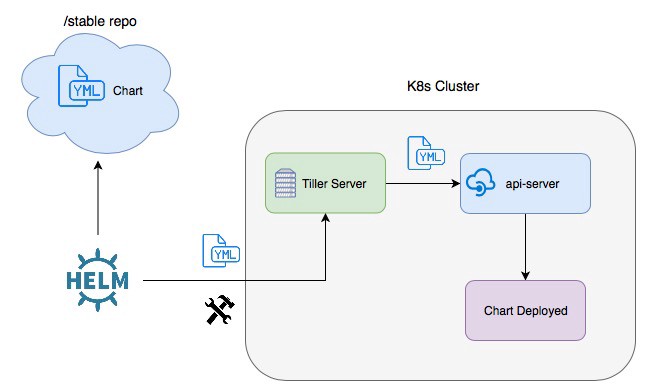
In oder to interact with the cluster and deploy Helm charts, the Helm client (running in your computer) communicates with a remote piece of software running in the cluster, the tiller server. Tiller is a Kubernetes deployment containing one pod with one container, and it communicates directly with the API server (the Kubernetes control plane front-end) in order to deploy charts.
Tiller receives orders from the Helm client over a gRPC connection and creates, upgrades, deletes and keeps track of what is known as Helm releases. Every time a new release is created or an existing one is upgraded, Helm stores its associated data, as well as the status of the release, being able to show the entire history of a release. In the image below, you can see the release microservice-prod, wich was first installed, and upgraded afterwards.

Although it is a powerful tool, tiller can be also a very dangerous element within your cluster, as everyone (or everything) that is able to communicate with tiller, can deploy resources in the cluster if the tiller deployment is not properly secured. Thus, tiller is removed in the newest Helm version, Helm v3.
In Helm v2 tiller maintains the state of the releases already deployed or superseded by means of ConfigMaps deployed in tiller’s namespace. Helm v3, the ’tillerless’ version of Helm, stores the releases data in secrets, which are placed in the release namespace, eliminating the need for tiller, and thus making Helm more secure.
Helm plugins
Helm functionalities can be widely expanded by using plugins. There are several plugins that can be added to your Helm client installation, and its management is quite simple. You can even develop you own plugins using your favorite scripting language. I’ve already tried bash and python, and I’m quite happy with the result!
Adding a Helm plugin is an easy task, as the Helm client provides a command to do so. The code snippet below installs the Hypnoglow S3 plugin, which allows you to use an AWS S3 bucket as a Helm chart repository.
Once installed, you can add the s3 bucket as a repository and pull and push Helm packages in a transparent way.
If you want to get some more information about Helm plugins visit https://helm.sh/docs/topics/plugins/
Try it by yourself
As in previous Kubernetes articles, I assume that you have access to a cluster in which you can play and test new stuff. If that’s no the case, don’t worry, you can easily set up an all-in-one cluster in you machine with minikube.
First of all, we need to install Helm. To do so, check the version you want to download (I would encourage you to try Helm v3) accordingly to your OS in this link. Once you have it, download, decompress and place the binary in the path from where you want to execute it (add it to you $PATH if possible).
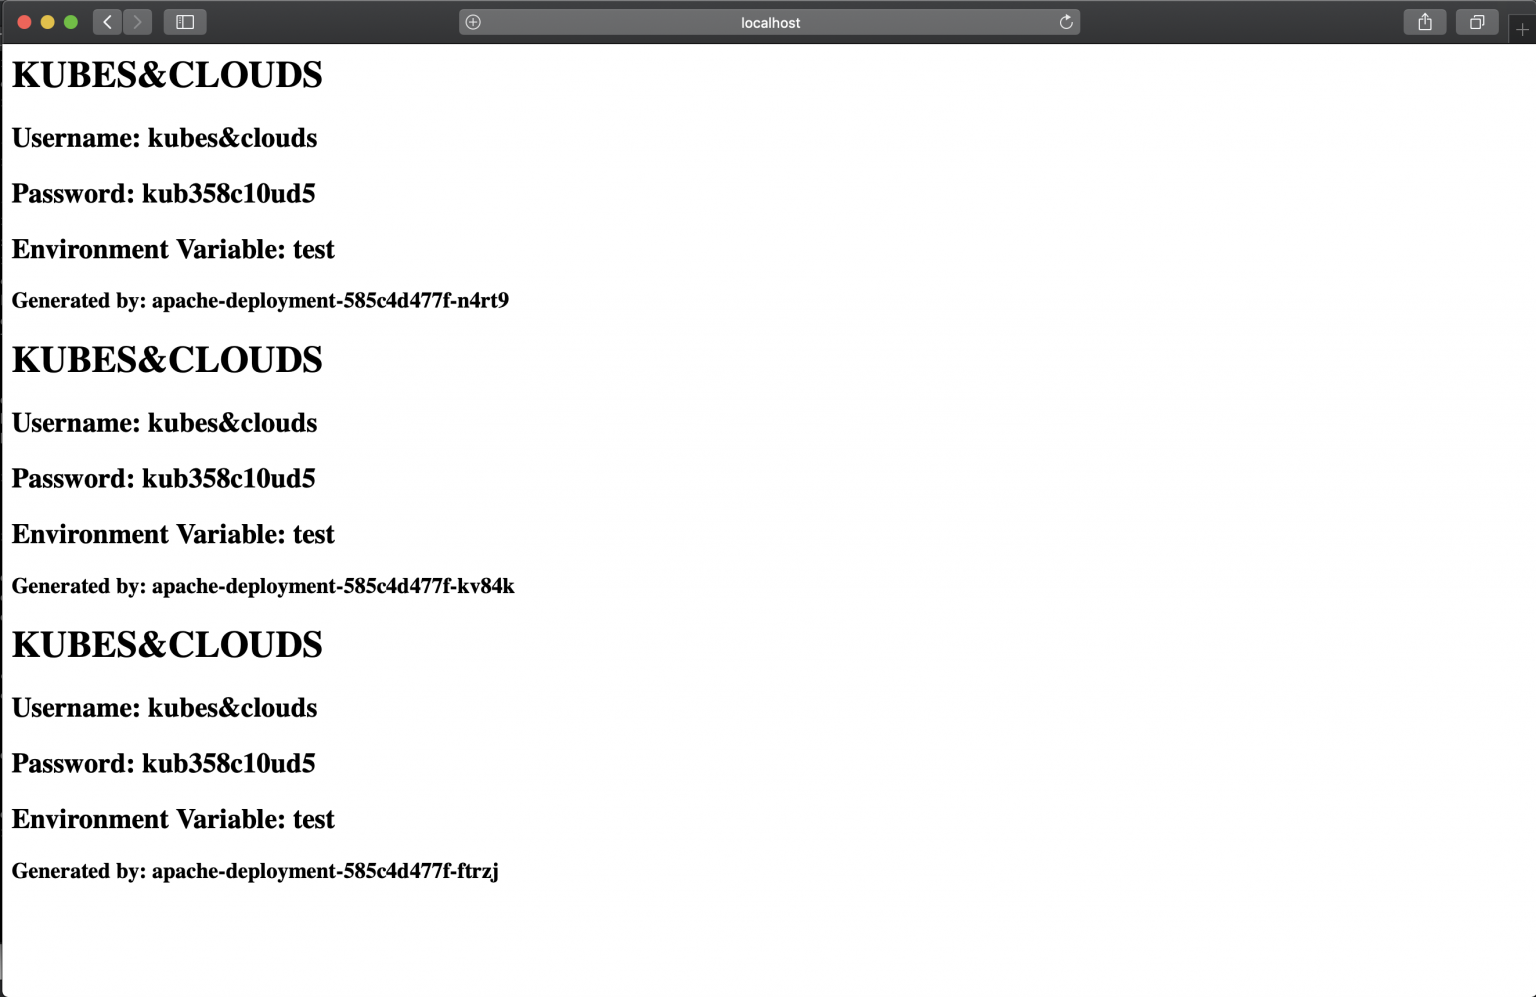
The second step will be cloning the repo containing the Helm chart to deploy. This repo contains a Helm chart which deploys a Nginx web server with some added features. Long story short, it deploys three front end Nginx pods which share the same common PVC where the index page is stored. Each container writes a greeting message into the file containing its own hostname and some of the variables that are passed by means of secrets and ConfigMaps.
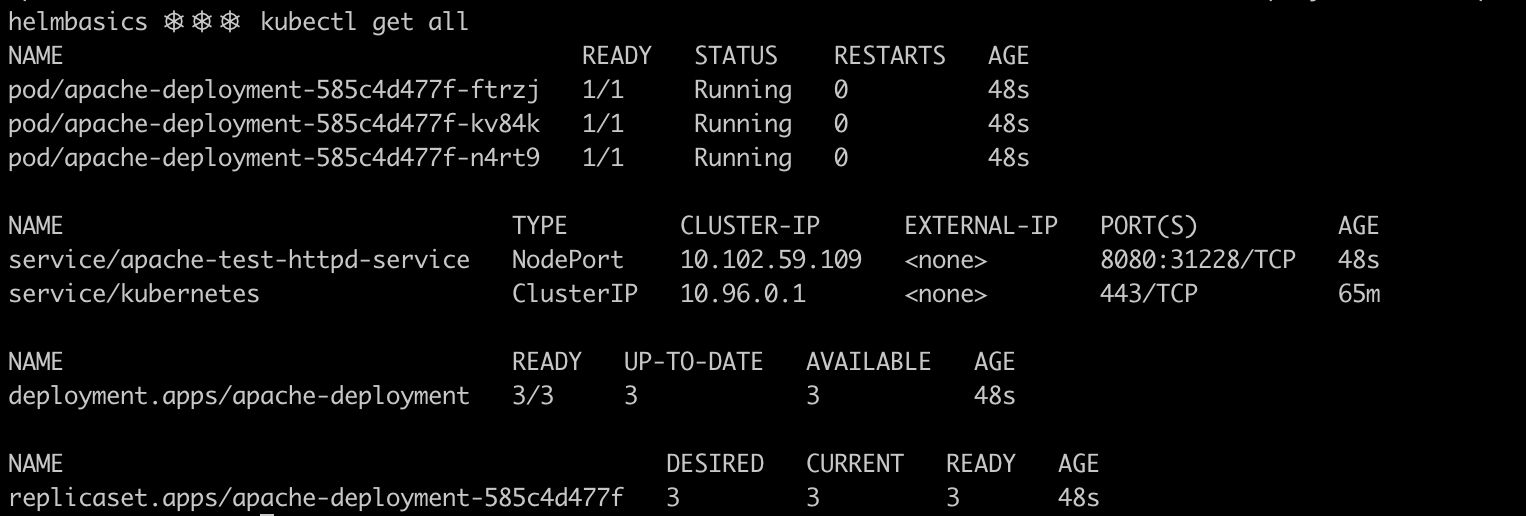
Now we are ready to install the Helm release in our cluster! The name of the release will be apache-test, and . specifies that the chart we want to deploy is located within the current directory.

As you can see, the deployment is successful, and all the resources have been deployed.
You can access the service using the following url http://localhost:31228, as the service is exposed using a nodePort in that same port number.
Let’s modify the values a little bit and upgrade our release. Rather than changing the values directly in the file. You can use the –set flag for this purpose, specifying key value pairs, separated by commas.
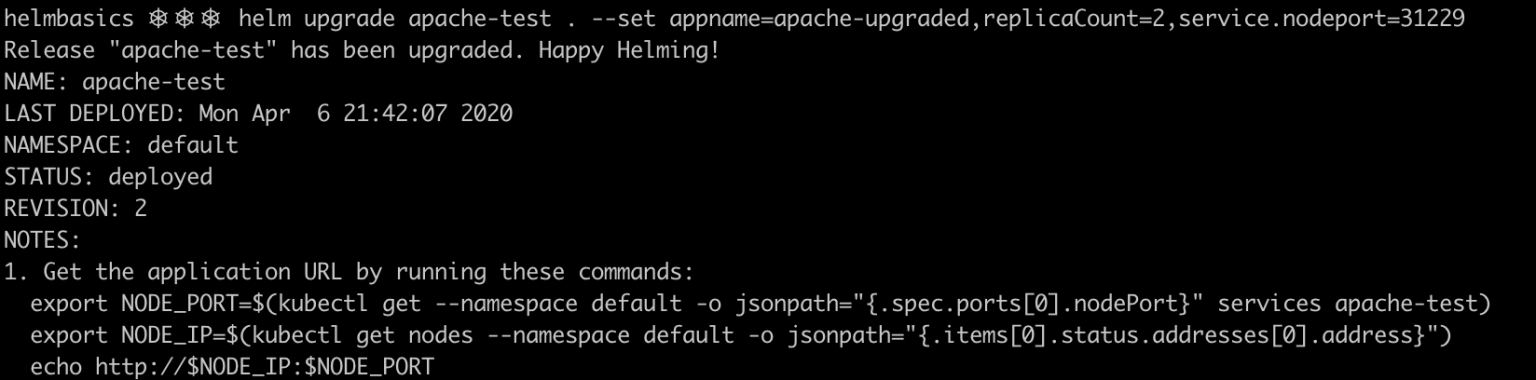
Now the deployment will be exposed in the port 31229 of the physical host, and the number of replicas has been reduced to 2.

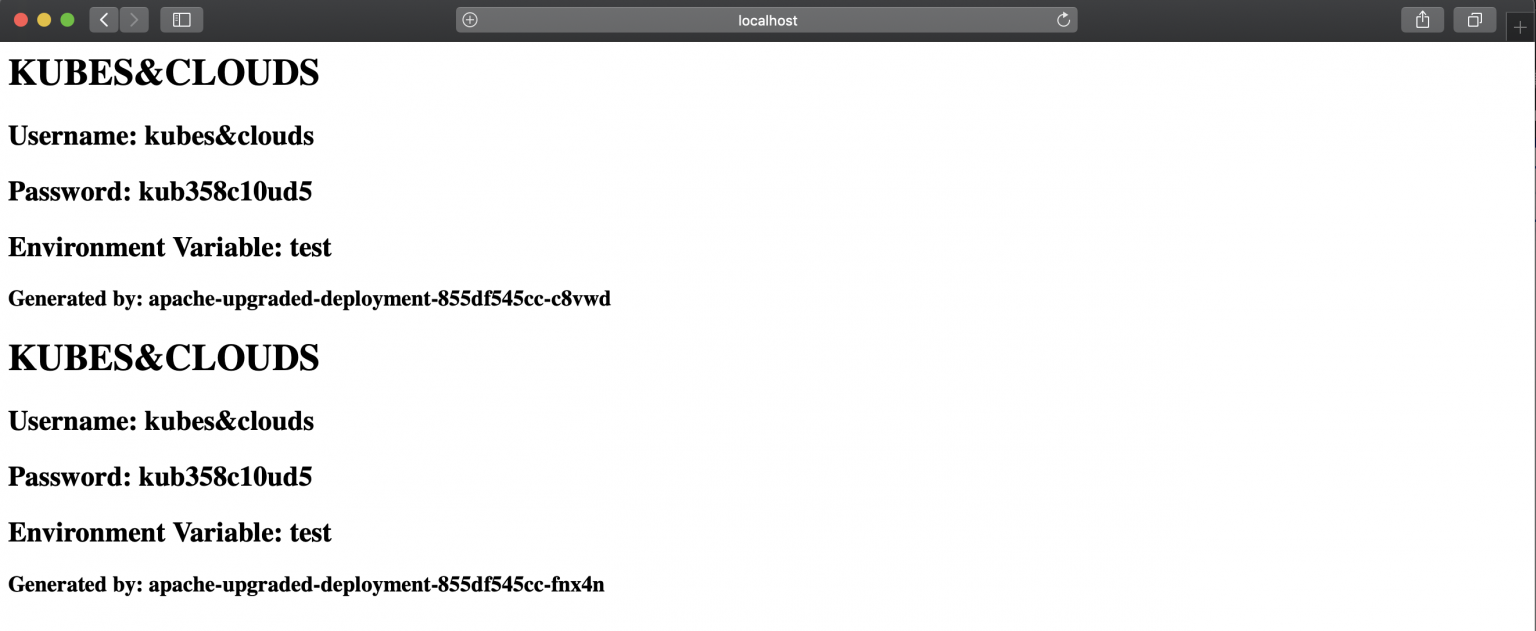
You got it! The deployment was scaled down by one replica, and the resources were renamed with the new appname.
Conclusion
In this post we reviewed Helm, providing an overall introduction to the capabilities that this tool offers. We detailed charts structure, and Helm repositories, as well as Helm internal architecture. Besides, we looked into the Go templating features that are offered by Helm, as well as the expanded functionalities provided by plugins. Finally, we summed up all this concepts together into a simple but interesting DIY Helm release, having the chance to interact with the cli.
As you have seen, Helm is a powerful tool indeed, and it is widely used for Kubernetes deployments, as it allows to use one chart for different environments and it provides a basic but effective release tracking.
Helm full potential can be achieved when integrated with more complex and advanced DevOps tools, such as fluxCD Helm Operators and automation servers such as Jenkins or Bamboo, to use it as an automated deployment tool within the CD (Continuous Deployment) cycle.
Mastering Helm and using it in production environments require a lot of practice and learning, as well as a deep Kubernetes knowledge, so now it’s your turn to keep learning!
.jpeg)


